Skip to content

2016

使用Docker容器部署Java Spring伺服器

在這份指南中,我將展示如何使用Docker部署Java Spring伺服器。請按照以下步驟操作:

1.啟動一個Ubuntu Server

對於這份演示,我們假設你已經啟動了一個運行Ubuntu 14.04的伺服器。使用APT資源庫安裝Docker:

sudo apt-get update
sudo apt-get install apt-transport-https ca-certificates
sudo apt-key adv --keyserver hkp://p80.pool.sks-keyservers.net:80 --recv-keys 58118E89F3A912897C070ADBF76221572C52609D

使用你最喜歡的文字編輯器打開/etc/apt/sources.list.d/docker.list,並添加以下行:

deb [https://apt.dockerproject.org/repo](https://apt.dockerproject.org/repo) ubuntu-trusty main

繼續在伺服器上安裝Docker:

sudo apt-get update
sudo apt-get install docker-engine
sudo service docker start
2.構建Docker映像

登入Docker Hub (https://hub.docker.com/),並創建新的儲存庫。然後,在你的終端機運行:

docker login

被提示時輸入您的用戶名和密碼。

在你的本地開發Java Spring資料夾,創建一個Dockerfile,內容如下:

FROM frolvlad/alpine-oraclejdk8:slim
VOLUME /tmp
ADD target/fleet-beacon*.jar app.jar
EXPOSE 8080
RUN sh -c 'touch /app.jar'
ENTRYPOINT ["java", "-jar", "/app.jar"]

要構建映像,執行:

docker build -t username/repo-name .

這裡,-t代表"tag"。將usernamerepo-name替換成你的Docker Hub用戶名和儲存庫名稱。也不要忘記最後的句點。

將構建的映像推送到您的遠程儲存庫:

docker push username/repo-name
3.拉取Docker映像

在您的遠程Ubuntu伺服器上,登入Docker並拉取映像:

docker pull username/repo-name

在後臺運行容器:

docker run -d -p 8080:8080 username/repo-name

這裡,-d表示"detached", -p指定所有暴露的端口(例如,8080)都應該發布到主機接口。

4.設置Nginx

使用Vim編輯器,打開/etc/nginx/sites-available/default並將其修改如下:

server {
  listen 80 default_server;
  listen [::]:80 default_server ipv6only=on;

  root /usr/share/nginx/html;
  index index.html index.htm;
  server_name localhost;

  location / {
    proxy_set_header X-Forwarded-Host $host;
    proxy_set_header X-Forwarded-Server $host;
    proxy_set_header X-Forwarded-For $proxy_add_x_forwarded_for;
    proxy_pass [http://localhost:8080/](http://localhost:8080/);
  }
}

退出並使用:wq!保存。

就這樣!打開瀏覽器,導航到你的遠程伺服器的IP地址;你應該能看到Java Spring頁面運行正常。

5.問題排查

如果你遇到Docker守護進程連接的問題,出現:

Cannot connect to the Docker daemon. Is the Docker daemon running on this host?

運行以下命令:

eval $(docker-machine env default)

如果你正在本地測試且找不到你的IP地址,用這個命令找到它:

docker-machine ls

如果你遇到任何其他問題,請隨時在下方留言。

Apple Push Notification with Java Spring Framework

I'm implementing a Java Spring Framework server that sends Apple Push Notifications to an iPhone using Swift. Here are the things you will need:

1. Account Setup

Assuming you already have an Apple developer account with certificates, log in to Apple Developer, go to the tab Identifiers and click "+" to add a new one. Fill in the prefix and suffix, then remember to check the box for “Push Notifications.”

Image1 Image2

Next, select Edit and scroll to the Push Notifications section. Here, you'll see the “Configurable” orange indicators. Create and download the Development SSL certificate using your CSR file. Double-click to run it and add it to your keychain.

Image3

Open Keychain Access, find the certificate, and export it as a .p12 file. You'll be prompted to enter a password—don't leave it blank. Otherwise, the Java Spring app may not be able to parse an empty string. Save this file for later use.

Image4

2. Xcode Setup

Create a new Xcode project, such as a Single View Application. In the Capabilities tab, enable “Push Notifications” and log in with your Apple ID.

Image5

In AppDelegate.swift, add a method to create an instance of settings, which will prompt the user for permission when the app launches:

func registerForPushNotifications(application: UIApplication) {
  let notificationSettings = UIUserNotificationSettings(forTypes: [.Badge, .Sound, .Alert], categories: nil)
  application.registerUserNotificationSettings(notificationSettings)
}

Invoke this method when the application finishes launching:

func application(application: UIApplication, didFinishLaunchingWithOptions launchOptions: [NSObject: AnyObject]?) -> Bool {
  // Override point for customization after application launch.
  registerForPushNotifications(application)
  return true
}

In the same AppDelegate.swift file, add methods to handle the user's permission decision:

func application(application: UIApplication, didRegisterUserNotificationSettings notificationSettings: UIUserNotificationSettings) {
  if notificationSettings.types != .None {
    application.registerForRemoteNotifications()
  }
}

If the registration is successful, add:

func application(application: UIApplication, didRegisterForRemoteNotificationsWithDeviceToken deviceToken: NSData) {
  let tokenChars = UnsafePointer<CChar>(deviceToken.bytes)
  var tokenString = ""

  for i in 0..<deviceToken.length {
    tokenString += String(format: "%02.2hhx", arguments: [tokenChars[i]])
  }

  print("Device Token:", tokenString)
}

And for registration failure:

func application(application: UIApplication, didFailToRegisterForRemoteNotificationsWithError error: NSError) {
  print("Failed to register:", error)
}

To test, you'll need a physical device; a simulator won't work. If successful, you should see the device token in the console. Note this for later use.

Image6

3. Java Spring Server Setup

Create a Java Spring Framework server using your favorite IDE like NetBeans or IntelliJ. In this example, we are using a Maven build with a pom.xml file like this:

<!-- pom.xml content -->

We will utilize the notnoop library from the Maven Repository. Add this dependency to your pom.xml:

<dependency>
  <groupId>com.notnoop.apns</groupId>
  <artifactId>apns</artifactId>
  <version>1.0.0.Beta6</version>
</dependency>

When the server starts, it will look for the main class, for example, PushNotificationApplication.java:

// PushNotificationApplication.java content

For demonstration purposes, we will create a NotificationController.java:

// NotificationController.java content

Replace the placeholders in the code with your actual .p12 file path, password, and device token. If you're unsure about the file path, place the .p12 file at the same level as your /src folder, i.e., the root of the project folder.

Run the following commands to install and start the server:

mvn install
mvn spring-boot:run

Open your browser and navigate to http://localhost:8080/notification. You should receive a notification!

Image7

Feel free to reach out if you have any questions :)


Note: The content inside the code blocks (XML, Swift, and Java) was not changed. Make sure that the content is accurate and up-to-date.

Apple Push Notification with Java Spring Framework

Welcome to "Continuous Improvement," the podcast where we explore different strategies for personal and professional growth. I'm your host, Victor, and in today's episode, we'll be diving into the world of Java Spring Framework and Apple Push Notifications. If you're passionate about software development like me, this is an exciting topic that you don't want to miss.

But before we begin, a quick reminder to subscribe to our podcast so you never miss an episode. And if you find our content valuable, please consider leaving a review. Your support means a lot to us.

Alright, let's jump right into it. Today, we'll be discussing how to set up a Java Spring Framework server that sends Apple Push Notifications to an iPhone using Swift. We'll go step by step, covering all the necessary components and configurations you'll need along the way.

So let's get started with account setup. Assuming you already have an Apple developer account with certificates, log in to the Apple Developer website. Once you're in, navigate to the "Identifiers" tab and create a new identifier for your application. Make sure to check the box for "Push Notifications" when filling out the details.

[PAUSE]

Great job so far! Now, let's move on to the Xcode setup. Create a new Xcode project, such as a Single View Application. In the project settings, enable "Push Notifications" capabilities and ensure that you're logged in with your Apple ID.

Next, open the AppDelegate.swift file and add a method to register for push notifications. This method will prompt the user for permission when the app launches. Remember to invoke this method in the didFinishLaunchingWithOptions function.

[PAUSE]

Fantastic! Now let's handle the user's permission decision. In the AppDelegate.swift file, add the necessary methods to handle the registration success and failure cases. When the registration is successful, you'll receive a device token that you'll need later. So make sure to print it out for reference.

[PAUSE]

You're doing great! Now, let's shift our focus to the Java Spring Server Setup. Create a Java Spring Framework server using your preferred IDE, such as NetBeans or IntelliJ. We'll be using Maven as our build tool, so make sure you have a pom.xml file in your project.

Within the pom.xml, add the necessary dependency for APNs (Apple Push Notification service) from the Maven Repository. This will allow us to send push notifications to iOS devices.

[PAUSE]

Now that we have our dependencies in place, let's dive into the code. In your project's main class, typically named PushNotificationApplication.java, you'll configure your Spring Boot application.

Additionally, we'll create a NotificationController.java class to handle the notification sending logic. This is where you'll need to replace the placeholders with the actual path to your .p12 file, password, and device token.

[PAUSE]

With the code setup complete, it's time to run our Java Spring server. Open your terminal or command prompt and execute the following commands: mvn install to install the necessary dependencies, and mvn spring-boot:run to start the server.

Once the server is up and running, open your browser and navigate to the specified endpoint, such as http://localhost:8080/notification. Amazingly, you should receive a notification on your iPhone!

[PAUSE]

And there you have it! You've successfully set up a Java Spring Framework server to send Apple Push Notifications. This is just the beginning of the endless possibilities you can explore with these technologies.

If you want to dive deeper into the specifics or have any questions, feel free to reach out. We're always here to help.

Thank you for tuning in to today's episode of "Continuous Improvement." I hope you found it informative and inspiring as you continue your journey of growth and learning. Remember, embracing continuous improvement in all aspects of your life will lead to great things.

Don't forget to subscribe to our podcast and leave a review if you enjoyed this episode. Until next time, this is Victor signing off.

使用Java Spring框架的蘋果推送通知

我正在實現一個使用Java Spring Framework伺服器,使用Swift向iPhone發送Apple推送通知。以下是你將需要的東西:

1. 設定帳戶

假設您已經有一個帶有證書的Apple開發者帳戶,登入 Apple Developer,前往 Identifiers 分頁並點擊"+" 新增一個。填寫前綴和後綴,然後記住勾選 "推送通知" 的箱子。

Image1 Image2

接下来,选择 編輯,滚到 推送通知部分。在这里,你会看到“能够配置”的橙色指示器。使用你的CSR文件创建并下载Development SSL证书。双击运行它,并将其添加到你的钥匙链。

Image3

开启 钥匙链访问,找到证书,并将其导出为 .p12 文件。你会被提示输入密码 - 不要将其留空。否则,Java Spring应用程序可能无法解析空字符串。将此文件保存以供以后使用。

Image4

2. Xcode 設置

建立一个新的Xcode项目,例如一个单视图应用。在功能分頁中,開啟“推送通知”並用你的Apple ID登入。

Image5

AppDelegate.swift 中,新增一個方法來建立一個設定的實例,這將在應用啟動時提示用戶許可:

func registerForPushNotifications(application: UIApplication) {
  let notificationSettings = UIUserNotificationSettings(forTypes: [.Badge, .Sound, .Alert], categories: nil)
  application.registerUserNotificationSettings(notificationSettings)
}

当应用完成启动时调用此方法:

func application(application: UIApplication, didFinishLaunchingWithOptions launchOptions: [NSObject: AnyObject]?) -> Bool {
  // Override point for customization after application launch.
  registerForPushNotifications(application)
  return true
}

在同一個 AppDelegate.swift 文件中,新增方法以處理用戶的權限決定:

func application(application: UIApplication, didRegisterUserNotificationSettings notificationSettings: UIUserNotificationSettings) {
  if notificationSettings.types != .None {
    application.registerForRemoteNotifications()
  }
}

如果注册成功,新增:

func application(application: UIApplication, didRegisterForRemoteNotificationsWithDeviceToken deviceToken: NSData) {
  let tokenChars = UnsafePointer<CChar>(deviceToken.bytes)
  var tokenString = ""

  for i in 0..<deviceToken.length {
    tokenString += String(format: "%02.2hhx", arguments: [tokenChars[i]])
  }

  print("Device Token:", tokenString)
}

如果注册失败:

func application(application: UIApplication, didFailToRegisterForRemoteNotificationsWithError error: NSError) {
  print("Failed to register:", error)
}

測試時,您將需要一個實體設備;模擬器將無法使用。如果成功,您應該在控制台中看到設備令牌。记下这个供后来使用。

Image6

3. Java Spring 服务器设置

使用你喜欢的IDE(如NetBeans或IntelliJ)创建一个Java Spring Framework服务器。在这个例子中,我们正在使用一个配备pom.xml文件的Maven构建:

<!-- pom.xml content -->

我们将使用来自Maven Repository的 notnoop库。将此依赖项添加到你的 pom.xml:

<dependency>
  <groupId>com.notnoop.apns</groupId>
  <artifactId>apns</artifactId>
  <version>1.0.0.Beta6</version>
</dependency>

服务器启动时,它会寻找主类,例如 PushNotificationApplication.java

// PushNotificationApplication.java content

为了演示目的,我们将创建一个 NotificationController.java

// NotificationController.java content

用你真正的 .p12 文件路径,密码,和设备令牌替换代码中的占位符。如果您对文件路径不确定,将 .p12 文件放在 /src 文件夹的同一级别,即项目文件夹的根目录。

运行以下命令以安装并启动服务器:

mvn install
mvn spring-boot:run

打开你的浏览器并导航到 http://localhost:8080/notification。你应该收到通知!

Image7

如果你有任何疑問,隨時聯絡我 :)


注意:代码块 (XML, Swift, 和 Java) 内的内容未作更改。确保内容准确且最新。

Submitting a Unity 3D Game to the Mac App Store

After three months of weekend development, our Unity 3D game is ready to be released and deployed to the App Store. However, the process was far from straightforward. I spent an entire night figuring it out. After many trials and errors, I decided to document some of the key steps here:

1. Unity Build Settings

In Unity, go to "File" > "Build Settings" > "Platform: PC, Mac & Linux Standalone" > "Target Platform: Mac OS".

Click "Player Settings..." and configure the following options:

Default is Full Screen = true
Default is Native Resolution = true
Capture Single Screen = false
Display Resolution Dialog = false
Mac App Store Validation = true
2. Info.plist

In Finder, right-click on the game app and select 'Show Package Content'. Inside the Content folder, edit the Info.plist file. Ensure:

  1. CFBundleGetInfoString is a valid string.
  2. CFBundleIdentifier and CFBundleSignature have values that match the bundle id (explained later).
  3. CFBundleShortVersionString and CFBundleVersion are in x.x.x format, e.g., 1.0.0.
  4. Add a new <key>LSApplicationCategoryType</key> with value <string>public.app-category.games</string>.

Example shown below:

    <?xml version="1.0" encoding="UTF-8"?>
    <!DOCTYPE plist PUBLIC "-//Apple//DTD PLIST 1.0//EN" "http://www.apple.com/DTDs/PropertyList-1.0.dtd">
    <plist version="1.0">
    <dict>
     <!-- ... your keys and values here ... -->
    </dict>
    </plist>
3. Entitlements

In your Build folder, create a file named GAMENAME.entitlements with a sandbox key, like this:

    <?xml version="1.0" encoding="UTF-8"?>
    <!DOCTYPE plist PUBLIC "-//Apple//DTD PLIST 1.0//EN" "http://www.apple.com/DTDs/PropertyList-1.0.dtd">
    <plist version="1.0">
    <dict>
        <key>com.apple.security.app-sandbox</key>
        <true/>
    </dict>
    </plist>
4. Apple Developer Account

Assuming you already have a paid Apple Developer account, visit Apple Developer Account. Then, go to Certificates and choose the dropdown with "OS X". Click the "+" button to create new certificates. You will need to complete the process twice to get a "Mac App Distribution" and a "Mac Installer Distribution" certificate. Save them to your keychain for later use.

Next, go to "Identifiers" and choose the "App IDs" tab. Create a Wildcard App ID, but make sure it matches the bundle ID values from the previous step. For example, mine is unity.victorleungtw.*

5. iTunes Connect

Log in to iTunes Connect, go to My Apps > "+" > "New Mac App", and fill in the required fields. Make sure the Bundle ID matches the one from the previous step. The Prefix field should be the game name, such as ufo in my case.

You'll also need to take screenshots and crop them to the correct sizes. Only the following sizes are allowed:

  • 1280 x 800 pixels
  • 1440 x 900 pixels
  • 2560 x 1600 pixels
  • 2880 x 1800 pixels
6. Application Loader

Download and install the latest Application Loader to submit the app. Complete the following steps:

Fix the content permissions via a terminal command:

    chmod -R a+xr "/path/to/GAMENAME.app"

Sign the app with the entitlements document created in step 3:

    codesign -f -s '3rd Party Mac Developer Application: DEVELOPER NAME' --entitlements "GAMENAME.entitlements" "/AppPath/GAMENAME.app"

You're likely to encounter the error:

    code object is not signed at all

This occurs because subcomponents are not signed. You could sign them individually, including libmono.0.dylib and libMonoPosixHelper.dylib, but an easier way is to use the deep-sign command like this:

    codesign -f -s '3rd Party Mac Developer Application: DEVELOPER NAME' --entitlements "GAMENAME.entitlements

" "/AppPath/GAMENAME.app" --deep

Next, build the .pkg file:

    productbuild --component GAMENAME.app /Applications --sign "3rd Party Mac Developer Installer: DEVELOPER NAME" GAMENAME.pkg

Remove any existing instances of the game app from your machine. Then, you can verify the install with:

    sudo installer -store -pkg GAMENAME.pkg -target /

Finally, open the Application Loader and choose 'Deliver Your App', selecting the GAMENAME.pkg. If everything goes well, the upload should succeed. Otherwise, address any specific errors accordingly. The process will take some time.

7. Select the Build

If you receive an email citing issues such as:

> **Invalid Signature** — The main app bundle game at path GAMENAME.app has the following signing errors: invalid Info.plist (the plist or signature has been modified) in architecture: i386.

It's likely that one of your subcomponents wasn't signed correctly. You may need to consult Apple's documentation for further guidance.

Otherwise, return to iTunes Connect, select the uploaded build, and change the status from "Preparing for Review" to "Waiting For Review" > "Review" > "Ready for Sale."

I hope this blog post is helpful and saves you some time! :)

Submitting a Unity 3D Game to the Mac App Store

Welcome back to another episode of Continuous Improvement! I'm your host, Victor, and in today's episode, we'll be diving into the process of deploying a Unity 3D game to the App Store.

Now, if you've ever been through the process of releasing a game, you know it's not always straightforward. It requires careful planning, attention to detail, and some technical know-how. In fact, just the other day, I went through this process myself, and let me tell you, it was quite the journey. But don't worry, because today, I'm going to walk you through the key steps I took to successfully deploy my game to the App Store.

Step one: Unity Build Settings. In Unity, navigate to "File," then "Build Settings." From there, select "Platform: PC, Mac & Linux Standalone," and set the "Target Platform" to "Mac OS." Now, click on "Player Settings..." and make sure to configure the following options: set "Default is Full Screen" to true, "Default is Native Resolution" to true, "Capture Single Screen" to false, "Display Resolution Dialog" to false, and enable "Mac App Store Validation."

Step two: Info.plist. In Finder, right-click on your game app and select "Show Package Content." Locate and open the Info.plist file. Ensure that the CFBundleGetInfoString is a valid string and that the CFBundleIdentifier and CFBundleSignature have values that match your bundle ID. Additionally, make sure that the CFBundleShortVersionString and CFBundleVersion are in the correct format, such as "x.x.x." Lastly, add a new key called "LSApplicationCategoryType" with the value "public.app-category.games."

Step three: Entitlements. Create a file named "GAMENAME.entitlements" in your Build folder. Inside this file, include the following:

    <?xml version="1.0" encoding="UTF-8"?>
    <!DOCTYPE plist PUBLIC "-//Apple//DTD PLIST 1.0//EN" "http://www.apple.com/DTDs/PropertyList-1.0.dtd">
    <plist version="1.0">
    <dict>
        <key>com.apple.security.app-sandbox</key>
        <true/>
    </dict>
    </plist>

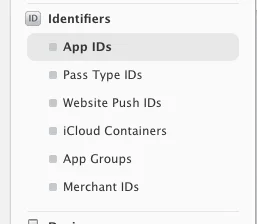
Step four: Apple Developer Account. Assuming you already have a paid Apple Developer account, visit the Apple Developer website and go to "Certificates." Select the dropdown for "OS X" and create new certificates for "Mac App Distribution" and "Mac Installer Distribution." Don't forget to save these certificates for later use. After that, go to "Identifiers" and create a Wildcard App ID that matches your bundle ID.

Step five: iTunes Connect. Log in to iTunes Connect, navigate to "My Apps," and click on the "+" button to create a new Mac App. Fill in all the required fields, making sure that the Bundle ID matches the one from previous steps. Additionally, remember to take screenshots and crop them to the correct sizes: 1280 x 800 pixels, 1440 x 900 pixels, 2560 x 1600 pixels, and 2880 x 1800 pixels.

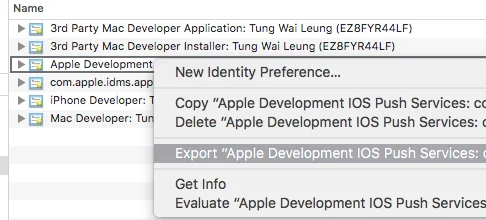
Step six: Application Loader. Download and install the latest version of Application Loader. In the terminal, fix the content permissions using the command "chmod -R a+xr /path/to/GAMENAME.app." Then, sign the app with the entitlements document created earlier using the command "codesign -f -s '3rd Party Mac Developer Application: DEVELOPER NAME' --entitlements "GAMENAME.entitlements" "/AppPath/GAMENAME.app"." You may encounter an error about code objects not being signed, but don't worry! You can use the deep-sign command to resolve this issue. Next, build the ".pkg" file using the command "productbuild --component GAMENAME.app /Applications --sign '3rd Party Mac Developer Installer: DEVELOPER NAME' GAMENAME.pkg."

Remove any existing instances of the game app from your machine, and finally, verify the install by using the command "sudo installer -store -pkg GAMENAME.pkg -target /." Now, open the Application Loader and choose 'Deliver Your App,' selecting the GAMENAME.pkg. If all goes well, the upload should succeed. However, if you encounter any specific errors, address them accordingly.

Step seven: Select the Build. Sometimes, you may receive an email indicating issues with your build's signature. This often occurs when a subcomponent hasn't been signed correctly. In such cases, consult Apple's documentation for further guidance. Otherwise, return to iTunes Connect, select your uploaded build, and change the status from "Preparing for Review" to "Waiting For Review," "Review," and finally, "Ready for Sale."

And there you have it! The key steps to successfully deploying a Unity 3D game to the App Store. I hope this episode has been helpful for those of you going through the same process. Remember, continuous improvement is the key to success, so don't be afraid to learn from your mistakes and keep refining your process. Thanks for tuning in to Continuous Improvement. I'm Victor, and until next time, keep striving for greatness.

將Unity 3D遊戲提交到Mac應用商店

經過三個月的週末開發,我們的Unity 3D遊戲已經準備好發布並部署到App Store。然而,這個過程並不直觀。我花了一整夜來解決它。經過許多嘗試和錯誤,我決定在這裡記錄一些關鍵的步驟:

![./2016-05-29.png]

1. Unity生成設置

在Unity中,齁到"檔案" > "建立設置" > "平台: PC, Mac與Linux獨立" > "目標平台: Mac OS"。

點擊"玩家設置...",並配置以下選項:

默認為全屏=真
默認是原生分辨率=真
抓取單一螢幕=假
顯示分辨率對話框=假
Mac應用商店驗證=真
2. Info.plist

在Finder中,右擊遊戲應用並選擇'顯示包內容'。在內容文件夾中,編輯Info.plist文件。確保:

  1. CFBundleGetInfoString是一個有效的字符串。
  2. CFBundleIdentifier和CFBundleSignature的值與bundle id(稍後解釋)匹配。
  3. CFBundleShortVersionString和CFBundleVersion的格式為x.x.x,例如1.0.0。
  4. 新增一個<key>LSApplicationCategoryType</key>,值為<string>public.app-category.games</string>

以下面的例子為例:

    <?xml version="1.0" encoding="UTF-8"?>
    <!DOCTYPE plist PUBLIC "-//Apple//DTD PLIST 1.0//EN" "http://www.apple.com/DTDs/PropertyList-1.0.dtd">
    <plist version="1.0">
    <dict>
     <!-- ... your keys and values here ... -->
    </dict>
    </plist>
3. 授權資訊

在你的Build文件夾中,創建一個名為GAMENAME.entitlements的文件,添加一個sandbox鍵,如下所示:

    <?xml version="1.0" encoding="UTF-8"?>
    <!DOCTYPE plist PUBLIC "-//Apple//DTD PLIST 1.0//EN" "http://www.apple.com/DTDs/PropertyList-1.0.dtd">
    <plist version="1.0">
    <dict>
        <key>com.apple.security.app-sandbox</key>
        <true/>
    </dict>
    </plist>
4. Apple開發者帳戶

假設你已經有一個付費的Apple開發者帳戶,訪問 Apple Developer Account。然後,轉到證書並選擇"OS X"的下拉列表。點擊"+"按鈕創建新的證書。你需要完成兩次這個過程以獲取"Mac應用分發"和"Mac安裝程序分發"證書。將它們保存到你的鑰匙鏈以供日後使用。

然後,轉到"識別碼"並選擇"應用ID"標籤。創建一個萬用應用ID,但要確保它與前一步驟中的bundle ID值匹配。例如,我的是unity.victorleungtw.*

5. iTunes Connect

登錄到 iTunes Connect,轉到 我的應用 > "+" > "新的Mac應用",並填寫所需的欄位。確定 Bundle ID 與前一階段的配置相符。前綴欄位應為遊戲名稱,例如在我的情況下,它是ufo

你也需要拍攝屏幕截圖,並將它們修剪到正確的大小。只允許以下的尺寸:

  • 1280 x 800 像素
  • 1440 x 900 像素
  • 2560 x 1600 像素
  • 2880 x 1800 像素
6. 應用加載器

下載並安裝最新的應用加載器,用來提交應用。完成以下步驟:

在終端機中填寫內容權限:

    chmod -R a+xr "/path/to/GAMENAME.app"

用第三步中創建的授權信息文件簽署應用:

    codesign -f -s '3rd Party Mac Developer Application: DEVELOPER NAME' --entitlements "GAMENAME.entitlements" "/AppPath/GAMENAME.app"

你可能會遇到以下的錯誤:

    code object is not signed at all

這是因為子元件沒有簽署。你可以逐個簽署它們,包括libmono.0.dyliblibMonoPosixHelper.dylib,但個更簡單的方法是使用深度簽名命令,如下所示:

    codesign -f -s '3rd Party Mac Developer Application: DEVELOPER NAME' --entitlements "GAMENAME.entitlements

" "/AppPath/GAMENAME.app" --deep

然後,構建.pkg文件:

    productbuild --component GAMENAME.app /Applications --sign "3rd Party Mac Developer Installer: DEVELOPER NAME" GAMENAME.pkg

從你的機器中刪除所有已存在的遊戲應用。然後你可以用下面的命令驗證原則:

    sudo installer -store -pkg GAMENAME.pkg -target /

最後,打開應用加載器,選擇'提交你的應用',並選擇GAMENAME.pkg。如果一切正常,上傳應該會成功。否則,根據相應的錯誤來解決問題。這個過程需要一些時間。

7. 選擇構建

如果你收到了包含如下問題的郵件:

> **無效簽名** — 主應用包game在路徑GAMENAME.app有以下簽名錯誤:在架構i386中的Info.plist無效(plist或簽名已被修改)。

這可能是你的某個子元件沒有正確簽署。你可能需要參考蘋果的文件尋找進一步的指導。

否則,返回到iTunes Connect,選擇已上傳的構建,並將狀態從"準備審查"變更為"等待審查" > "審查" > "銷售準備就緒"。

我希望這個博客文章對你有所幫助,也希望可以為你節省一些時間!:)

Resolving Merge Conflicts for the Unity Game Engine

I'm working with a team of four on a Unity 3D game project over the weekends. It's a lot of fun, but we've encountered problems with version control. Using Git and GitHub, we've faced many merge conflicts that are not easy to resolve; it's not as simple as just deleting a section or performing a forced push:

    <<<<<<< HEAD:main.scene
    Painful
    =======
    Delete me
    >>>>>>>

There are lots of unnecessary local meta files that get pushed to our repository. The solution I've found is not perfect, but it works:

First, open the Unity editor and go to:

    Edit -> Project Settings -> Editor ->
    Select "**Visible Meta files**" in the version control mode

Second, add a .gitignore file like this:

    /[Ll]ibrary/
    /[Tt]emp/
    /[Oo]bj/
    /[Bb]uild/
    /[Bb]uilds/
    /Assets/AssetStoreTools*

    # Autogenerated VS/MD solution and project files
    ExportedObj/
    *.csproj
    *.unityproj
    *.sln
    *.suo
    *.tmp
    *.user
    *.userprefs
    *.pidb
    *.booproj
    *.svd

    # Unity3D generated meta files
    *.pidb.meta

    # Unity3D Generated File On Crash Reports
    sysinfo.txt

    # Builds
    *.apk
    *.unitypackage

    .DS_Store

Then, commit the actual changes and run the following commands:

    git rm -r --cached .
    git add .
    git commit -m "Fixed untracked files"

Third, Unity has a tool called UnityYAMLMerge for merging scene and prefab files. Enable this by creating a .gitconfig file with the following:

    [merge]
    tool = unityyamlmerge

    [mergetool "unityyamlmerge"]
    trustExitCode = false
    cmd = /Applications/Unity/Unity.app/Contents/Tools/UnityYAMLMerge merge -p "$BASE" "$REMOTE" "$LOCAL" "$MERGED"

The next time a teammate clones the project, they may initially see an empty scene. However, there's no need to panic. Simply open the saved main.scene (assuming you have saved the scene and committed it), and everything else should work as expected. I wish Unity had built-in source control like other IDE environments. Happy coding!

Resolving Merge Conflicts for the Unity Game Engine

Welcome back to "Continuous Improvement," the podcast where we explore various challenges and solutions in the world of software development. I'm your host, Victor, and today we have an interesting topic to discuss - version control conflicts in Unity 3D game development.

So, recently, I've been working on a Unity 3D game project with a small team. It's been a lot of fun, but we've encountered some issues with version control, specifically when using Git and GitHub. Merge conflicts have become quite common, and resolving them hasn't been as simple as we initially thought.

Let me illustrate with an example. Imagine you have a merge conflict in a Unity scene file. It looks something like this:

Painful

Now, this type of conflict is not straightforward to manage. Deleting a section or performing a forced push won't solve the problem. So, what can we do about it?

Let's explore a solution I've discovered through trial and error. It's not perfect, but it works. Firstly, open the Unity editor and navigate to:

Edit -> Project Settings -> Editor -> Select "Visible Meta files" in the version control mode.

This will help eliminate unnecessary local meta files from being pushed to the repository. But we're not done yet. We need to add a .gitignore file to our project. Here's an example of what it could look like:

/[Ll]ibrary/
/[Tt]emp/
/[Oo]bj/
/[Bb]uild/
/[Bb]uilds/
/Assets/AssetStoreTools*

# Autogenerated VS/MD solution and project files
ExportedObj/
*.csproj
*.unityproj
*.sln
*.suo
*.tmp
*.user
*.userprefs
*.pidb
*.booproj
*.svd

# Unity3D generated meta files
*.pidb.meta

# Unity3D Generated File On Crash Reports
sysinfo.txt

# Builds
*.apk
*.unitypackage

.DS_Store

Once you have added the .gitignore file, commit the changes. Now, let's run a few commands to clean up the repository and make it ready for proper version control.

git rm -r --cached .
git add .
git commit -m "Fixed untracked files"

These commands will remove untracked files, add the necessary files, and create a commit with a specific message.

Lastly, Unity provides a tool called UnityYAMLMerge specifically designed for merging scene and prefab files. To enable this tool, we need to create a .gitconfig file with the following content:

[merge]
tool = unityyamlmerge

[mergetool "unityyamlmerge"]
trustExitCode = false
cmd = /Applications/Unity/Unity.app/Contents/Tools/UnityYAMLMerge merge -p "$BASE" "$REMOTE" "$LOCAL" "$MERGED"

By configuring Git with this .gitconfig file, we can leverage UnityYAMLMerge to handle these conflicts efficiently.

Keep in mind that when a teammate clones the project for the first time, they might see an empty scene. However, there's no need to panic. By simply opening the saved main.scene (assuming it has been saved and committed previously), everything should work as expected.

I hope these tips and tricks can make your Unity 3D game development experience a little smoother. Wouldn't it be great if Unity offered built-in source control integration like other IDEs? Ah, well, we can still make the most out of the tools we have.

That's all for today's episode of "Continuous Improvement." If you have any questions or suggestions for future topics, feel free to reach out. Until next time, keep coding and striving for excellence. Goodbye!

解決Unity遊戲引擎的合併衝突

我正和一個四人的團隊在周末進行一個Unity 3D遊戲項目的工作。這很有趣,但我們遇到了版本控制的問題。使用Git和GitHub,我們遇到了許多不容易解決的合併衝突; 它不僅僅是刪除一個部分或執行強制推送那麼簡單:

    <<<<<<< HEAD:main.scene
    痛苦
    =======
    刪除我
    >>>>>>>

有很多不必要的本地元資料檔案被推送到我們的存儲庫。我找到的解決方案並不完美,但它有效:

首先,打開Unity編輯器並前往:

    編輯 -> 項目設置 -> 編輯器 ->
    在版本控制模式中選擇 "**可見Meta文件**"

其次,添加一個 .gitignore 資料檔案像這樣:

    /[Ll]ibrary/
    /[Tt]emp/
    /[Oo]bj/
    /[Bb]uild/
    /[Bb]uilds/
    /Assets/AssetStoreTools*

    # 自動生成的VS/MD解決方案和項目文件
    ExportedObj/
    *.csproj
    *.unityproj
    *.sln
    *.suo
    *.tmp
    *.user
    *.userprefs
    *.pidb
    *.booproj
    *.svd

    # Unity3D生成的meta文件
    *.pidb.meta

    # Unity3D在崩潰報告上生成的文件
    sysinfo.txt

    # Builds
    *.apk
    *.unitypackage

    .DS_Store

然後,提交實際的更改並運行以下命令:

    git rm -r --cached .
    git add .
    git commit -m "Fixed untracked files"

第三,Unity有一個叫UnityYAMLMerge的工具用於合併場景和prefab文件。通過創建一個.gitconfig文件並使用以下內容來啟用:

    [merge]
    tool = unityyamlmerge

    [mergetool "unityyamlmerge"]
    trustExitCode = false
    cmd = /Applications/Unity/Unity.app/Contents/Tools/UnityYAMLMerge merge -p "$BASE" "$REMOTE" "$LOCAL" "$MERGED"

下次隊伍的某個成員克隆該項目時,他們可能最初會看到一個空的場景。但是,不必慌張。只需打開已保存的main.scene(假設您已經保存並提交了場景),其他東西就應該如預期的那樣工作。我希望Unity像其他IDE環境一樣內置源代碼控制。編碼愉快!