Skip to content

2018

Retrieving Real-Time Data from the Web to Excel

An undergraduate student recently asked me how to import real-time data from a website into Excel for a homework assignment. Many sources for financial data charge fees, so I offered him a simple, free solution. Now, I'll share that solution with you as well.

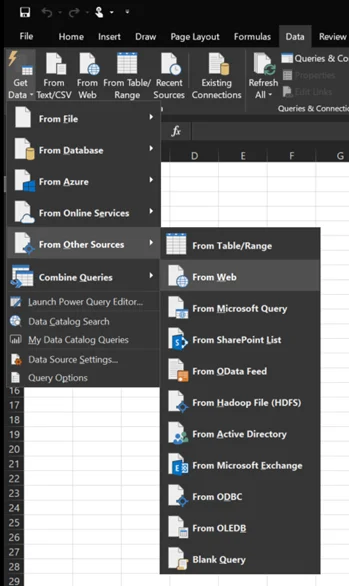
First, open Microsoft Excel 365 and go to the Data tab. Look for the option to Get Data from Other Sources and select Web.

Data Tab

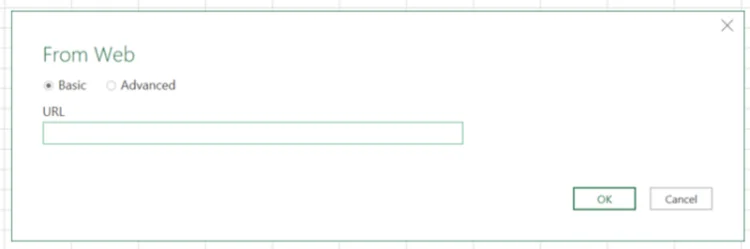
Next, input the URL containing the data you want to retrieve.

Input URL

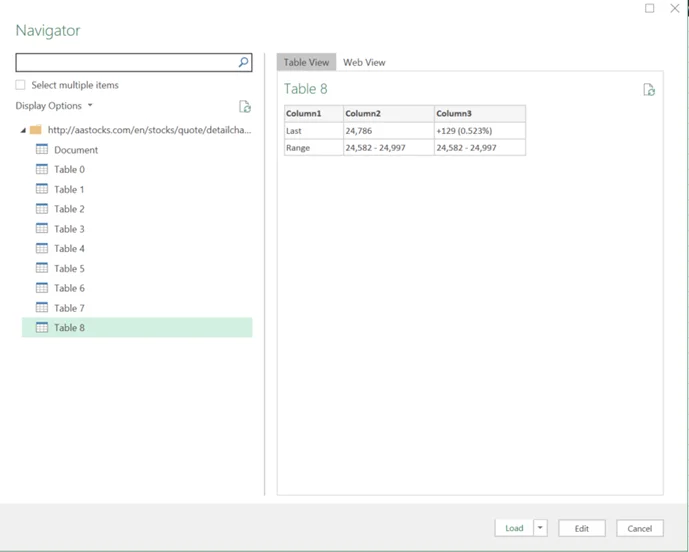
The Navigator will then display various tables to choose from. For this example, we'll select Table 8.

Select Table

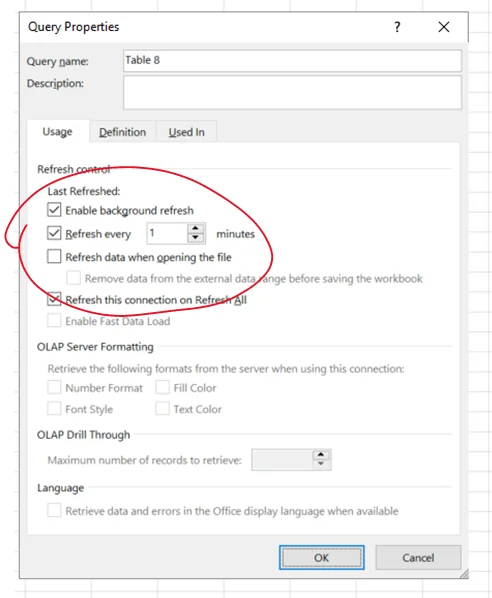
Once this is done, the data will be imported into your Excel spreadsheet. However, it will need manual refreshing. To automate this, right-click on the query and change the Properties to Refresh Every 1 Minute.

Auto Refresh

That works well for minute-by-minute updates. But what if you want nearly real-time updates every second? In that case, you'll need to write some code.

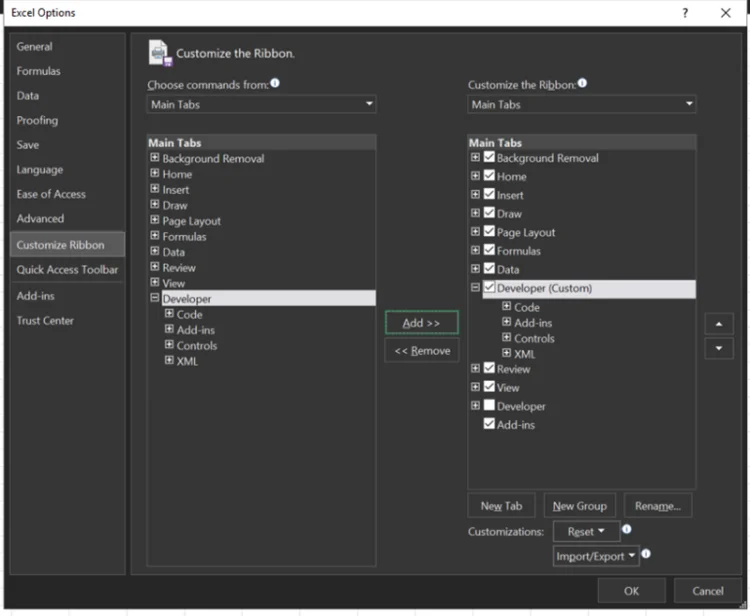
Navigate to File -> Options -> Customize Ribbon. Under Main Tabs, enable the Developer Tab.

Developer Tab

Then, in the Developer tab, select Visual Basic.

Visual Basic

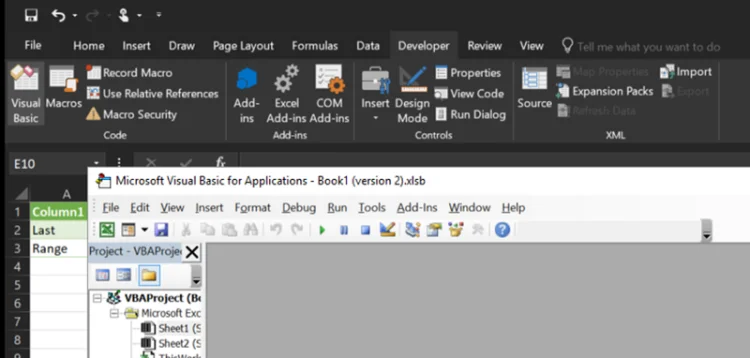
Choose Insert -> Module and then copy and paste the code snippet below:

Sub refresh_data()
    Sheets("Sheet2").Select
    Range("B2").Select
    Selection.Copy

    Sheets("Sheet1").Select
    Dim xCell As Range
    For Each xCell In ActiveSheet.Columns(1).Cells
        If Len(xCell.Value) = 0 Then
            xCell.Select
            Exit For
        End If
    Next
    ActiveSheet.Paste

    Sheets("Sheet2").Select
    ActiveWorkbook.RefreshAll
    Application.OnTime DateAdd("s", 1, Now), "refresh_data"
End Sub

Paste Code

Click Run, and you're all set! This code can be translated into simple steps: select Sheet 2, copy the current value, go to Sheet 1, find the last row of the first column and paste the value there, then return to Sheet 2 and refresh all data. Finally, the code will trigger itself every second, allowing you to achieve nearly real-time data updates in Excel.

If you have any further questions, feel free to leave a comment below. 🙂

從網路檢索實時數據到Excel

一位本科生最近問我如何將網站上的實時數據導入Excel來完成作業。許多金融數據來源都需要收費,因此我提供了一個簡單的、免費的解決方案。現在,我也將這個解決方案分享給您。

首先,打開Microsoft Excel 365並轉到數據選項卡。找到從其他來源獲取數據的選項,然後選擇網絡

數據選項卡

接下來,輸入包含所需數據的URL

輸入網址

然後導航器將顯示各種可選表格。對於這個例子,我們選擇表格8。

選擇表格

當這個完成后,數據將導入您的Excel表格。但是,它需要手動刷新。要自動化這個過程,請右鍵點擊查詢,然後將屬性更改為每1分鐘刷新一次

自動刷新

這對於每分鐘更新一次很有用。但是如果你希望每秒鐘幾乎實時更新怎麼辦?在那種情況下,您需要編寫一些代碼。

導航到文件 -> 選項 -> 自定義功能區。在主選項卡下,啟用開發者選項卡

開發人員選項卡

然後,在開發者選項卡中,選擇Visual Basic

Visual Basic

選擇插入 -> 模塊,然後復制並粘貼下面的代碼片段:

Sub refresh_data()
    Sheets("Sheet2").Select
    Range("B2").Select
    Selection.Copy

    Sheets("Sheet1").Select
    Dim xCell As Range
    For Each xCell In ActiveSheet.Columns(1).Cells
        If Len(xCell.Value) = 0 Then
            xCell.Select
            Exit For
        End If
    Next
    ActiveSheet.Paste

    Sheets("Sheet2").Select
    ActiveWorkbook.RefreshAll
    Application.OnTime DateAdd("s", 1, Now), "refresh_data"
End Sub

粘貼代碼

點擊運行,然後就全部設定完成了!這段代碼可以翻譯為簡單的步驟:選擇Sheet 2,複制當前值,去到Sheet 1,找到第一列的最後一行並將值粘貼在那裡,然後回到Sheet 2並刷新所有數據。最後,該代碼將每秒觸發一次,使您能夠在Excel中實現幾乎實時的數據更新。

如果您有任何進一步的問題,隨時在下面留言。:)

Enabling HTTPS on an AWS EC2 Instance with Node.js and Nginx on an Ubuntu Server

I have an AWS EC2 instance running Node.js and Nginx on an Ubuntu 16.04 server. In this tutorial, I will show you how to switch your website from HTTP to HTTPS using Let's Encrypt. HTTPS prevents unauthorized tampering with the communication between your website and your users' browsers. It encrypts this communication using Transport Layer Security (TLS) Certification. Let’s Encrypt is a certificate authority that provides free X.509 certificates.

Firstly, SSH into your EC2 instance:

ssh -i <keyfile.pem> ubuntu@<public-ip-address>

Next, clone the Let’s Encrypt repository into the /opt/letsencrypt path:

sudo git clone https://github.com/letsencrypt/letsencrypt /opt/letsencrypt

Then, check if any application is listening on port 80 by running:

netstat -na | grep ':80.*LISTEN'

If any processes are returned, terminate them. For example, if you already have an Nginx server running on port 80, you may need to stop it as follows:

sudo systemctl stop nginx

After that, navigate to your repository with cd /opt/letsencrypt and run the following command to obtain the certificates:

./letsencrypt-auto certonly --standalone --email <your@email.com> -d <domain.com> -d <subdomain.domain.com>

If you encounter an error like this:

OSError: Command /opt/eff.org/certbot/venv/bin/python2.7 - setuptools pkg_resources pip wheel failed with error code 1

Then set the following environment variables before you rerun the script:

export LC_ALL="en_US.UTF-8"
export LC_CTYPE="en_US.UTF-8"

Follow the on-screen instructions, and you should receive your certificates at the path /etc/letsencrypt/live/<domain.com>.

Next, configure the Nginx settings to redirect your HTTP traffic to HTTPS. Edit the file using:

sudo vi /etc/nginx/sites-available/default

The content should look like this (remember to replace <YourDomain.com> and the root path for your website):

server {
  listen 443 ssl;
  server_name <YourDomain.com>;
  ssl_certificate /etc/letsencrypt/live/<YourDomain.com>/fullchain.pem;
  ssl_certificate_key /etc/letsencrypt/live/<YourDomain.com>/privkey.pem;
  ssl_protocols TLSv1 TLSv1.1 TLSv1.2;
  ssl_prefer_server_ciphers on;
  ssl_ciphers 'EECDH+AESGCM:EDH+AESGCM:AES256+EECDH:AES256+EDH';

  root /var/www/yourPath;
  index index.html index.htm;

  location / {
    proxy_pass http://localhost:3000/;
    proxy_http_version 1.1;
    proxy_set_header Upgrade $http_upgrade;
    proxy_set_header Connection "upgrade";
    proxy_set_header Host $http_host;
    proxy_set_header X-Real-IP $remote_addr;
    proxy_set_header X-Forwarded-For $proxy_add_x_forwarded_for;
    proxy_set_header X-Forwarded-Proto http;
    proxy_set_header X-Nginx-Proxy true;
    proxy_redirect off;
  }
}
server {
  listen 80;
  server_name <domain.com>;
  return 301 https://$host$request_uri;
}

To test your configuration for any errors, run:

sudo nginx -t

If everything is okay, restart Nginx:

sudo service nginx stop
sudo service nginx start

Last but not least, go to the AWS console and make sure your security group has port 443 open for HTTPS.

AWS Console Screenshot

Done! Navigate to the HTTPS version of your domain to verify that it's working. If you encounter issues like a 502 Bad Gateway error, ensure that your Node.js application is running correctly. I use PM2 to keep it running. Let's make the internet more secure! 🙂

在Ubuntu伺服器上使用Node.js和Nginx,為AWS EC2實例啟用HTTPS

我有一個在Ubuntu 16.04伺服器上運行Node.js和Nginx的AWS EC2實例。在這篇教程中,我將向你展示如何使用Let's Encrypt將你的網站從HTTP轉換為HTTPS。HTTPS防止未經授權的篡改你的網站與用戶瀏覽器之間的通信。它使用傳輸層安全性(TLS)認證對這種通信進行加密。Let’s Encrypt是一個提供免費X.509證書的證書頒發機構。

首先,SSH 連接到你的 EC2 實例:

ssh -i <keyfile.pem> ubuntu@<public-ip-address>

接著,將Let’s Encrypt的儲存庫複製到/opt/letsencrypt路徑:

sudo git clone https://github.com/letsencrypt/letsencrypt /opt/letsencrypt

然後,透過運行以下指令來檢查是否有任何應用程式正在監聽80端口:

netstat -na | grep ':80.*LISTEN'

如果返回任何進程,終止它們。例如,如果你已經有一個Nginx伺服器在80端口運行,你可能需要如下停止它:

sudo systemctl stop nginx

之後,導航到你的儲存庫cd /opt/letsencrypt,並運行以下命令以獲得證書:

./letsencrypt-auto certonly --standalone --email <your@email.com> -d <domain.com> -d <subdomain.domain.com>

如果你遇到像這樣的錯誤:

OSError: Command /opt/eff.org/certbot/venv/bin/python2.7 - setuptools pkg_resources pip wheel failed with error code 1

然後在重新運行腳本之前設置以下環境變數:

export LC_ALL="en_US.UTF-8"
export LC_CTYPE="en_US.UTF-8"

遵循屏幕上的指示,您應該在路徑/etc/letsencrypt/live/<domain.com>處獲得您的證書。

接下來,配置Nginx設置以將HTTP流量重新導向到HTTPS。使用以下命令編輯文件:

sudo vi /etc/nginx/sites-available/default

內容應該像這樣(記得替換<YourDomain.com> 和你的網站的根路徑):

server {
  listen 443 ssl;
  server_name <YourDomain.com>;
  ssl_certificate /etc/letsencrypt/live/<YourDomain.com>/fullchain.pem;
  ssl_certificate_key /etc/letsencrypt/live/<YourDomain.com>/privkey.pem;
  ssl_protocols TLSv1 TLSv1.1 TLSv1.2;
  ssl_prefer_server_ciphers on;
  ssl_ciphers 'EECDH+AESGCM:EDH+AESGCM:AES256+EECDH:AES256+EDH';

  root /var/www/yourPath;
  index index.html index.htm;

  location / {
    proxy_pass http://localhost:3000/;
    proxy_http_version 1.1;
    proxy_set_header Upgrade $http_upgrade;
    proxy_set_header Connection "upgrade";
    proxy_set_header Host $http_host;
    proxy_set_header X-Real-IP $remote_addr;
    proxy_set_header X-Forwarded-For $proxy_add_x_forwarded_for;
    proxy_set_header X-Forwarded-Proto http;
    proxy_set_header X-Nginx-Proxy true;
    proxy_redirect off;
  }
}
server {
  listen 80;
  server_name <domain.com>;
  return 301 https://$host$request_uri;
}

為了測試你的配置是否有任何錯誤,運行:

sudo nginx -t

如果一切正常,重啟Nginx:

sudo service nginx stop
sudo service nginx start

最後但並非最不重要的,前往 AWS 控制台,確保你的安全群組已打開 443 端口,開放 HTTPS 連接。

AWS Console Screenshot

完成!導航至HTTPS版本的你的網域,驗證它是否正常工作。如果您遇到像502 Bad Gateway這種錯誤,確保你的Node.js應用程式正確運行。我使用PM2來保持它運行。讓我們使網路更安全!🙂

Replace Text in XML Files with PowerShell

Yesterday, I was working at a client site that has a Windows server isolated from the external network. Installing any third-party software on the machine is not permitted.

PowerShell Script

However, I was tasked with replacing all XML file names from "My Report" to "My Report (New)". The original file, temp.xml, looks like this:

    <ReportList>
      <Report Name="My Report">
      </Report>
    </ReportList>

The expected output file, temp-new.xml, should have a structure like this:

    <ReportList>
      <Report Name="My Report (New)">
      </Report>
    </ReportList>

Without access to any specialized tools and facing the prospect of manually editing hundreds of files, I turned to PowerShell for scripting. Here are a few lines of code that accomplish the task:

Step 1: Load all XML files from my Test folder

    $files = Get-ChildItem C:\Users\victorleung\tw\Desktop\Test -Recurse -Include *.xml

Step 2: Modify all report names by adding " (New)" after the original name

    $xmldata = [xml](Get-Content $file);
    $name = $xmldata.ReportList.Report.GetAttribute("Name");
    $name = $name + " (New)";
    $xmldata.ReportList.Report.SetAttribute("Name", $name);
    $xmldata.Save($file)

Step 3: Change the file name from temp.xml to temp-new.xml

    Get-ChildItem *.xml | Rename-Item -NewName { $_.Name -Replace '.xml$','-new.xml' }

That's it! All the files have been changed. Happy coding! 😃

使用PowerShell替換XML文件中的文本

昨天,我在一個客戶現場工作,那裏有一個與外部網絡隔離的Windows伺服器。不允許在該機器上安裝任何第三方軟件。

PowerShell腳本

然而,我被交付了一項任務,要將所有XML文件名從“我的報告”換成“我的報告(新)”。原始文件,temp.xml,是這樣的:

    <ReportList>
      <Report Name="My Report">
      </Report>
    </ReportList>

預期的輸出文件,temp-new.xml,應有這樣的結構:

    <ReportList>
      <Report Name="My Report (New)">
      </Report>
    </ReportList>

沒有專門工具的訪問權限,並面對手動編輯數百個文件的前景,我轉向了PowerShell來編寫腳本。以下是完成此任務的幾行代碼:

步驟1:從我的測試文件夾中加載所有XML文件

    $files = Get-ChildItem C:\Users\victorleung\tw\Desktop\Test -Recurse -Include *.xml

步驟2:通過在原始名稱後添加"(新)"來修改所有報告名稱

    $xmldata = [xml](Get-Content $file);
    $name = $xmldata.ReportList.Report.GetAttribute("Name");
    $name = $name + " (New)";
    $xmldata.ReportList.Report.SetAttribute("Name", $name);
    $xmldata.Save($file)

步驟3:將文件名從temp.xml 改成 temp-new.xml

    Get-ChildItem *.xml | Rename-Item -NewName { $_.Name -Replace '.xml$','-new.xml' }

就是這樣!所有文件都已被更改。開心編碼!😃

Replace Text in a File Using a Batch Script

Yesterday, I was working at a client site. The site had a Windows server that was isolated from external internet access, and installing new software was prohibited.

I was tasked with removing all the id values in YAML files, setting them to null. For instance, the input file temp.yaml looks like this:

    something
      id: 4
    something else
      id: 64
    next one
      id: 231
    another one
      id: 34

The target file (result.yaml) that I wanted would look like this:

    something
      id:
    something else
      id:
    next one
      id:
    another one
      id:

The file was large, so removing each id value manually would be time-consuming. The only tool accessible on that Windows server was the CMD command prompt. Hence, I wrote a simple batch script to complete the task. Create a file called convert.bat in a text editor with the following content:

    @echo off
    for /f "tokens=1* delims=:" %%a in (temp.yaml) do (
      if "%%b"=="" (
        echo %%a
      ) else (
        echo %%a | find " id" > null && echo %%a: || echo %%a: %%b
      )
    ) > result.yaml

You can replace the text temp.yaml and result.yaml in the script with your target input and output files, respectively. Double-click to execute the script, and you're done!

For those unfamiliar with Batch scripts, here are some basic explanations:

  • @echo off means to suppress the command prompt display, effectively hiding it.
  • The for loop has some options. The tokens= parameter specifies which numbered items to read from each line (default is 1), and delims= specifies the delimiter character (default is a space).

  • The %%a and %%b variables are similar to arguments in batch files.

The last line exports the result to the desired file. This simple script saves a lot of time compared to doing the work manually. :)

使用批次腳本替換檔案中的文字

昨天,我在客戶的地點工作。該地點有一台Windows伺服器,該伺服器已與外部互聯網隔離,並禁止安裝新的軟體。

我被委託將YAML文件中的所有id值刪除,將它們設置為null。例如,輸入文件temp.yaml如下所示:

    something
      id: 4
    something else
      id: 64
    next one
      id: 231
    another one
      id: 34

我想要的目標文件(result.yaml)應該如下所示:

    something
      id:
    something else
      id:
    next one
      id:
    another one
      id:

該文件很大,因此手動刪除每個id值將非常耗時。該Windows伺服器上可訪問的唯一工具是CMD命令提示符。因此,我寫了一個簡單的批次腳本來完成這項任務。在文本編輯器中創建一個名為convert.bat的文件,其內容如下:

    @echo off
    for /f "tokens=1* delims=:" %%a in (temp.yaml) do (
      if "%%b"=="" (
        echo %%a
      ) else (
        echo %%a | find " id" > null && echo %%a: || echo %%a: %%b
      )
    ) > result.yaml

你可以在腳本中替換文本temp.yamlresult.yaml,分別代表你的目標輸入和輸出文件。雙擊執行腳本,你就完成了!

對於不熟悉批次腳本的人,這裡有一些基本解釋:

  • @echo off表示要抑制命令提示符的顯示,有效地將其隱藏。
  • for循環有一些選項。tokens=參數指定從每行讀取哪些編號項目(默認為1),delims=指定分隔符字符(默認為空格)。

  • %%a%%b變量與批次文件中的參數類似。

最後一行將結果輸出到所需的文件。與手動做這項工作相比,這個簡單的腳本節省了很多時間。:)

A Look into Chile’s Startup Ecosystem

In retrospect, my trip to Chile was fantastic. Although flying for over 30 hours from Hong Kong and dealing with jet lag was challenging, the adventure proved to be worthwhile. I learned a great deal, not just in a formal setting but also through intelligent and educational discussions. The tour enriched my understanding of the startup ecosystem, B-corporations, and the entrepreneurial spirit.

Chile's startup ecosystem is truly remarkable. During my visit, I learned that Santiago is the sixth-largest VC center in terms of dollars raised. Its proximity to Brazil, a significant market, makes it an ideal place for launching businesses in Latin America. Brazil and Argentina together account for 82% of the total value and represent over 80% of the regional ecosystem. Many successful startups, such as Mercado Libre, Despegar.com, and Arch Daily, either emulate successful business models from other countries or are world-firsts. Despite their geographical remoteness, Chilean firms like Lunna, Bluesmart, Poliglota, Recorrido.cl, and Destacama have a strong international presence. The growth of "Chilecon Valley," fueled by government support, has impressed me.

One discussion that particularly struck me revolved around B-corporations. I am aligned with the ideas of social impact and sustainability. When I had the opportunity to speak with the General Manager of a Venture Capital firm, I found that he prioritizes quick profitability and commercial viability. He had an interesting perspective on B-corporations, suggesting that balancing both the social ("B") and corporate ("corp") aspects is challenging. I agree with his viewpoint, as it resonates with my own experiences regarding the complexities of developing a long-term business model.

Reflecting on my journey, I've noticed that the primary cultural difference between Chile and Hong Kong lies in the entrepreneurial spirit of the inhabitants. In Hong Kong, most graduates aim for secure jobs with good income and a steady paycheck. In contrast, only 12% of Chileans were self-employed in 2008. The Hong Kong government offers limited support for the startup scene, as most of its GDP is concentrated in financial services and real estate, with little diversification. In contrast, the Chilean government heavily invests in the Startup Chile program, which backs two out of every ten enterprises.

Despite Chile's economy being primarily copper-based, the government has made extensive investments to import entrepreneurs to diversify the economy and improve people's quality of life in the long term. Hong Kong's culture is more risk-averse compared to Chile, where failure is viewed as an opportunity for learning.

I am interested in starting a business in Chile and have applied for a one-year visa under the Startup Chile program. After engaging with Fundacion Mi Parque, I'm considering launching a company that specializes in technical consultancy for non-profits (NGOs). We live in a digital world where technology is utilized to revolutionize traditional industries. However, many NGOs may not have the resources to employ an IT staff to build their websites, mobile apps, or Customer Relationship Management (CRM) tools. If I can secure government funding and donations, I plan to help these NGOs establish an online presence, thus reducing their cost per donation and increasing their societal impact.

One of the main reasons I pursued an MBA was to find a solution for balancing technology and business. I believe that technology itself is merely a tool and insufficient for solving problems on its own. It requires a mix of project management, cross-sectional skills, and the ability to scale business operations. According to the speakers, Chile ranks 37th in service exports, with IT accounting for 28% of the service export industry. Additionally, Chile is ranked 7th worldwide in terms of digitization, boasting some of the best programmers. I see a great opportunity to establish an IT consulting firm in Chile and create synergies with the Hong Kong startup community. My international experiences in Chile have given me a new perspective, and I continue to search for answers.

深入探討智利的創業生態系統

回顧過去,我對智利的旅行感到非常滿意。雖然從香港飛行超過30小時,並且要應對時差讓人感到有挑戰性,但這次冒險確實值得。我學到了很多東西,不僅在正式的環境中,也通過聰明和教育性的討論。這次旅行豐富了我對創業生態系統、B類公司和創業精神的理解。

智利的創業生態系統確實令人矚目。在我的訪問中,我了解到聖地亞哥是以籌集到的資金規模來看的第六大風險資本中心。其與巴西的鄰近,這個重要的市場,使它成為在拉丁美洲啟動業務的理想地點。巴西和阿根廷共同占該區域生態系統的82%的總價值,並代表超過80%的區域生態系統。許多成功的創業公司,如Mercado Libre、Despegar.com和Arch Daily,要么模仿來自其他國家的成功業務模式,要么是世界首創。儘管地理位置偏遠,像Lunna、Bluesmart、Poliglota、Recorrido.cl和Destacama這樣的智利公司在國際間有強烈的存在感。"Chilecon Valley"的增長,得到了政府的支援,給我留下了深刻的印象。

其中一個特別打動我的討論圍繞著B類公司。我非常認同社會影響力和可持續性的理念。當我有機會與一家風險資本公司的總經理交談時,我發現他更優先考慮快速的盈利能力和商業的可行性。他對B類公司有一種有趣的視角,認為在社會("B")和公司("corp")兩個方面之間找到平衡是有挑戰性的。我同意他的觀點,因為這與我自己對於開發長期商業模式的複雜性的經驗相吻合。

回顧我的旅程,我注意到智利與香港的主要文化差異在於居民的創業精神。在香港,大多數畢業生都希望找到一份有著良好收入和穩定工資的安全工作。相比之下,2008年只有12%的智利人自己創業。香港政府對創業場景的支持有限,因為其大部分GDP都集中在金融服務和房地產上,而且幾乎沒有多元化。相反,智利政府對Startup Chile計劃投入了大量資金,該計劃支持每十家企業中的兩家。

儘管智利的經濟主要基於銅礦產業,但政府進行了大量投資以進口創業者,以多元化經濟並改善人們長期的生活品質。與在智利視失敗為學習機會的文化相比,香港的文化更加地風險規避。

我有興趣在智利開業,並已經在Startup Chile計劃下申請了一年的簽證。在接觸Fundacion Mi Parque後,我考慮創建一家專業為非營利組織(NGOs)提供技術諮詢的公司。我們生活在一個數位的世界,技術被用於革新傳統行業。但是,許多NGO可能沒有資源來聘請IT人員來構建他們的網站、手機應用程式或者客戶關係管理(CRM)工具。如果我可以獲得政府的資金和捐款,我計劃幫助這些NGO建立在線存在感,從而降低他們每筆捐款的成本並增加他們對社會的影響力。

我追求MBA的主要原因之一是找到平衡技術和業務的解決方案。我相信技術本身只是一種工具,並不足以獨立解決問題。它需要項目管理、跨部門技能和能力來擴展業務操作的混合。根據演講者的說法,智利在服務出口方面排名第37,其中IT佔服務出口行業的28%。此外,智利在數位化方面位於世界第7,擁有一些最好的程式員。我看到在智利建立IT諮詢公司並與香港的創業社區創造協同效應的巨大機會。我在智利的國際經驗給了我新的視角,我繼續尋找答案。