Skip to content

2018

Replace Text in a File Using a Batch Script

Welcome to "Continuous Improvement," the podcast where we explore ways to enhance our productivity, efficiency, and effectiveness. I'm your host, Victor. In today's episode, we'll discuss a clever solution to a common problem. But before we dive in, I want to thank our sponsor, Productivity Pro.

Yesterday, I encountered a situation that many of us can relate to. I was at a client site, working on a Windows server with no internet access. The task at hand was to remove all the id values from YAML files and set them to null. With a large file and no convenient software options, it seemed like a time-consuming task.

But fear not, fellow productivity enthusiasts! I came up with a simple solution that saved me a tremendous amount of time. I wrote a batch script to automate the process. Let me walk you through the steps.

First, in your text editor, create a file called convert.bat. Make sure you have the necessary permissions on your Windows server. Now, let's take a closer look at the script itself.

Inside the convert.bat file, start with the line @echo off. This will suppress the command prompt display, allowing the script to run in the background without cluttering your screen.

Next, we'll use a for loop to read each line of the YAML file. Remember to replace the text temp.yaml with the name of your target input file and result.yaml with the desired output filename.

Within the loop, we check each line for the presence of the id value. If the value is empty, we echo the line without modification. However, if there is an id value present, we check for the phrase " id" using the find command. This ensures that only lines containing id are modified. If the phrase is found, we replace the line with %%a: followed by %%b, effectively setting the id value to null.

Finally, we redirect the output of the script to the desired file using > result.yaml.

And there you have it! By executing this script, you can effortlessly remove id values from YAML files without the need for additional software. It's a simple but effective solution that can save you valuable time and effort.

Remember, continuous improvement is all about finding innovative ways to work smarter, not harder. So next time you encounter a repetitive task, think outside the box and explore scripting or automation options. Who knows, you might just stumble upon a time-saving gem like this batch script.

Well, that wraps up today's episode of "Continuous Improvement." If you found this batch script helpful or have any other tips to share, feel free to reach out to me on social media. Don't forget to tune in next week for another insightful episode.

Until then, stay productive and keep striving for continuous improvement.

Thank you for listening to "Continuous Improvement." This podcast is brought to you by Productivity Pro, your go-to source for all things productivity. Visit our website at productivitypro.com for more resources and tools to supercharge your efficiency. And remember, a little improvement every day goes a long way.

Note: The script mentioned in this episode is for illustration purposes only. Always exercise caution when running scripts on your system and ensure they comply with your organization's policies and security measures.

使用批次腳本替換檔案中的文字

昨天,我在客戶的地點工作。該地點有一台Windows伺服器,該伺服器已與外部互聯網隔離,並禁止安裝新的軟體。

我被委託將YAML文件中的所有id值刪除,將它們設置為null。例如,輸入文件temp.yaml如下所示:

    something
      id: 4
    something else
      id: 64
    next one
      id: 231
    another one
      id: 34

我想要的目標文件(result.yaml)應該如下所示:

    something
      id:
    something else
      id:
    next one
      id:
    another one
      id:

該文件很大,因此手動刪除每個id值將非常耗時。該Windows伺服器上可訪問的唯一工具是CMD命令提示符。因此,我寫了一個簡單的批次腳本來完成這項任務。在文本編輯器中創建一個名為convert.bat的文件,其內容如下:

    @echo off
    for /f "tokens=1* delims=:" %%a in (temp.yaml) do (
      if "%%b"=="" (
        echo %%a
      ) else (
        echo %%a | find " id" > null && echo %%a: || echo %%a: %%b
      )
    ) > result.yaml

你可以在腳本中替換文本temp.yamlresult.yaml,分別代表你的目標輸入和輸出文件。雙擊執行腳本,你就完成了!

對於不熟悉批次腳本的人,這裡有一些基本解釋:

  • @echo off表示要抑制命令提示符的顯示,有效地將其隱藏。
  • for循環有一些選項。tokens=參數指定從每行讀取哪些編號項目(默認為1),delims=指定分隔符字符(默認為空格)。

  • %%a%%b變量與批次文件中的參數類似。

最後一行將結果輸出到所需的文件。與手動做這項工作相比,這個簡單的腳本節省了很多時間。:)

A Look into Chile’s Startup Ecosystem

In retrospect, my trip to Chile was fantastic. Although flying for over 30 hours from Hong Kong and dealing with jet lag was challenging, the adventure proved to be worthwhile. I learned a great deal, not just in a formal setting but also through intelligent and educational discussions. The tour enriched my understanding of the startup ecosystem, B-corporations, and the entrepreneurial spirit.

Chile's startup ecosystem is truly remarkable. During my visit, I learned that Santiago is the sixth-largest VC center in terms of dollars raised. Its proximity to Brazil, a significant market, makes it an ideal place for launching businesses in Latin America. Brazil and Argentina together account for 82% of the total value and represent over 80% of the regional ecosystem. Many successful startups, such as Mercado Libre, Despegar.com, and Arch Daily, either emulate successful business models from other countries or are world-firsts. Despite their geographical remoteness, Chilean firms like Lunna, Bluesmart, Poliglota, Recorrido.cl, and Destacama have a strong international presence. The growth of "Chilecon Valley," fueled by government support, has impressed me.

One discussion that particularly struck me revolved around B-corporations. I am aligned with the ideas of social impact and sustainability. When I had the opportunity to speak with the General Manager of a Venture Capital firm, I found that he prioritizes quick profitability and commercial viability. He had an interesting perspective on B-corporations, suggesting that balancing both the social ("B") and corporate ("corp") aspects is challenging. I agree with his viewpoint, as it resonates with my own experiences regarding the complexities of developing a long-term business model.

Reflecting on my journey, I've noticed that the primary cultural difference between Chile and Hong Kong lies in the entrepreneurial spirit of the inhabitants. In Hong Kong, most graduates aim for secure jobs with good income and a steady paycheck. In contrast, only 12% of Chileans were self-employed in 2008. The Hong Kong government offers limited support for the startup scene, as most of its GDP is concentrated in financial services and real estate, with little diversification. In contrast, the Chilean government heavily invests in the Startup Chile program, which backs two out of every ten enterprises.

Despite Chile's economy being primarily copper-based, the government has made extensive investments to import entrepreneurs to diversify the economy and improve people's quality of life in the long term. Hong Kong's culture is more risk-averse compared to Chile, where failure is viewed as an opportunity for learning.

I am interested in starting a business in Chile and have applied for a one-year visa under the Startup Chile program. After engaging with Fundacion Mi Parque, I'm considering launching a company that specializes in technical consultancy for non-profits (NGOs). We live in a digital world where technology is utilized to revolutionize traditional industries. However, many NGOs may not have the resources to employ an IT staff to build their websites, mobile apps, or Customer Relationship Management (CRM) tools. If I can secure government funding and donations, I plan to help these NGOs establish an online presence, thus reducing their cost per donation and increasing their societal impact.

One of the main reasons I pursued an MBA was to find a solution for balancing technology and business. I believe that technology itself is merely a tool and insufficient for solving problems on its own. It requires a mix of project management, cross-sectional skills, and the ability to scale business operations. According to the speakers, Chile ranks 37th in service exports, with IT accounting for 28% of the service export industry. Additionally, Chile is ranked 7th worldwide in terms of digitization, boasting some of the best programmers. I see a great opportunity to establish an IT consulting firm in Chile and create synergies with the Hong Kong startup community. My international experiences in Chile have given me a new perspective, and I continue to search for answers.

A Look into Chile’s Startup Ecosystem

Welcome to "Continuous Improvement," the podcast where we explore personal growth, entrepreneurial journeys, and the pursuit of excellence. I'm your host, Victor, and in today's episode, we'll be discussing my recent trip to Chile and the valuable insights it offered. From the vibrant startup ecosystem to the concept of B-corporations, there was much to learn. So let's dive in!

Chile's startup scene left me in awe. Did you know that Santiago is the sixth-largest VC center in terms of capital raised? It's a hub for launching businesses in Latin America, thanks to its proximity to major markets like Brazil and Argentina. From emulating successful business models to pioneering world-firsts, Chilean startups have made a significant impact. And with government support behind the growth of "Chilecon Valley," the country's startup ecosystem is thriving.

One conversation that struck a chord with me during my trip revolved around B-corporations. As someone passionate about social impact and sustainability, I was intrigued by the balance between social and corporate aspects. Speaking with the General Manager of a Venture Capital firm, we delved into the complexities of developing a long-term business model that prioritizes both profitability and positive social change. It's a delicate balance that requires careful consideration.

Reflecting on my journey, I couldn't help but notice the stark difference in entrepreneurial spirit between Chile and Hong Kong. In Hong Kong, most graduates seek secure jobs with a steady paycheck. In contrast, Chileans embrace risk, with only 12% being self-employed in 2008. The Chilean government has made tremendous investments in the Startup Chile program, aiming to diversify the economy and foster entrepreneurship. It's remarkable to see how failure is viewed as an opportunity for learning and growth.

Inspired by my experiences, I've decided to apply for a one-year visa under the Startup Chile program. I'm eager to launch a company specializing in technical consultancy for non-profits. In today's digital world, technology is essential for revolutionizing traditional industries, but many NGOs lack the resources to harness its potential. My goal is to help these organizations establish an online presence, reducing their cost per donation and amplifying their societal impact.

An MBA has always been my quest for finding that delicate balance between technology and business. Technology alone is just a tool; it requires a strategic blend of project management, cross-sectional skills, and scalability to solve real-world problems. And Chile offers a remarkable opportunity. With premium IT talent, ranking 7th worldwide in digitization, and 28% of service exports attributed to IT, establishing an IT consulting firm in Chile seems like a natural fit. Moreover, connecting with the vibrant startup community in Hong Kong can help create synergies and foster collaboration.

My journey to Chile has broadened my horizons, and I continue to seek answers, both for myself and for making a positive impact. Join me in the coming episodes of "Continuous Improvement," where we'll explore more entrepreneurial journeys, personal growth stories, and strategies for achieving excellence. Until then, keep striving for continuous improvement!

Thank you for listening to "Continuous Improvement," hosted by Victor. If you enjoyed this episode, don't forget to subscribe and leave a review. Stay tuned for the next episode, and remember, growth starts with the willingness to improve.

深入探討智利的創業生態系統

回顧過去,我對智利的旅行感到非常滿意。雖然從香港飛行超過30小時,並且要應對時差讓人感到有挑戰性,但這次冒險確實值得。我學到了很多東西,不僅在正式的環境中,也通過聰明和教育性的討論。這次旅行豐富了我對創業生態系統、B類公司和創業精神的理解。

智利的創業生態系統確實令人矚目。在我的訪問中,我了解到聖地亞哥是以籌集到的資金規模來看的第六大風險資本中心。其與巴西的鄰近,這個重要的市場,使它成為在拉丁美洲啟動業務的理想地點。巴西和阿根廷共同占該區域生態系統的82%的總價值,並代表超過80%的區域生態系統。許多成功的創業公司,如Mercado Libre、Despegar.com和Arch Daily,要么模仿來自其他國家的成功業務模式,要么是世界首創。儘管地理位置偏遠,像Lunna、Bluesmart、Poliglota、Recorrido.cl和Destacama這樣的智利公司在國際間有強烈的存在感。"Chilecon Valley"的增長,得到了政府的支援,給我留下了深刻的印象。

其中一個特別打動我的討論圍繞著B類公司。我非常認同社會影響力和可持續性的理念。當我有機會與一家風險資本公司的總經理交談時,我發現他更優先考慮快速的盈利能力和商業的可行性。他對B類公司有一種有趣的視角,認為在社會("B")和公司("corp")兩個方面之間找到平衡是有挑戰性的。我同意他的觀點,因為這與我自己對於開發長期商業模式的複雜性的經驗相吻合。

回顧我的旅程,我注意到智利與香港的主要文化差異在於居民的創業精神。在香港,大多數畢業生都希望找到一份有著良好收入和穩定工資的安全工作。相比之下,2008年只有12%的智利人自己創業。香港政府對創業場景的支持有限,因為其大部分GDP都集中在金融服務和房地產上,而且幾乎沒有多元化。相反,智利政府對Startup Chile計劃投入了大量資金,該計劃支持每十家企業中的兩家。

儘管智利的經濟主要基於銅礦產業,但政府進行了大量投資以進口創業者,以多元化經濟並改善人們長期的生活品質。與在智利視失敗為學習機會的文化相比,香港的文化更加地風險規避。

我有興趣在智利開業,並已經在Startup Chile計劃下申請了一年的簽證。在接觸Fundacion Mi Parque後,我考慮創建一家專業為非營利組織(NGOs)提供技術諮詢的公司。我們生活在一個數位的世界,技術被用於革新傳統行業。但是,許多NGO可能沒有資源來聘請IT人員來構建他們的網站、手機應用程式或者客戶關係管理(CRM)工具。如果我可以獲得政府的資金和捐款,我計劃幫助這些NGO建立在線存在感,從而降低他們每筆捐款的成本並增加他們對社會的影響力。

我追求MBA的主要原因之一是找到平衡技術和業務的解決方案。我相信技術本身只是一種工具,並不足以獨立解決問題。它需要項目管理、跨部門技能和能力來擴展業務操作的混合。根據演講者的說法,智利在服務出口方面排名第37,其中IT佔服務出口行業的28%。此外,智利在數位化方面位於世界第7,擁有一些最好的程式員。我看到在智利建立IT諮詢公司並與香港的創業社區創造協同效應的巨大機會。我在智利的國際經驗給了我新的視角,我繼續尋找答案。

Upgrade AppMon from Version 6.5 to 7.1

I am working on upgrading Dynatrace AppMon from version 6.5 to 7.1. AppMon is a performance data gathering tool trusted by many clients; it assists developers in troubleshooting issues within applications. This version upgrade includes new features and a new UI dashboard. Below are the steps to guide you through the process:

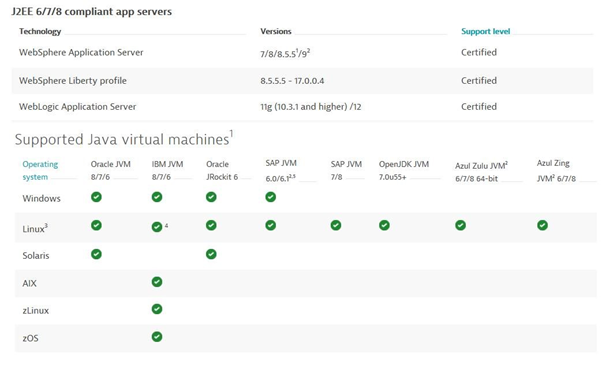
First, it's important to consult the system requirements for hardware and the operating system. System Requirements April 2018. For example, if you're running a legacy Java Virtual Machine (JVM), the help desk may not be able to assist you with issues. Make sure you have a 64-bit client and sufficient disk space.

Additionally, move the session storage location out of the installation directory before starting. It's recommended to back up both the session storage and configuration data. Be sure to consult the component compatibility matrix Component Compatibility beforehand.

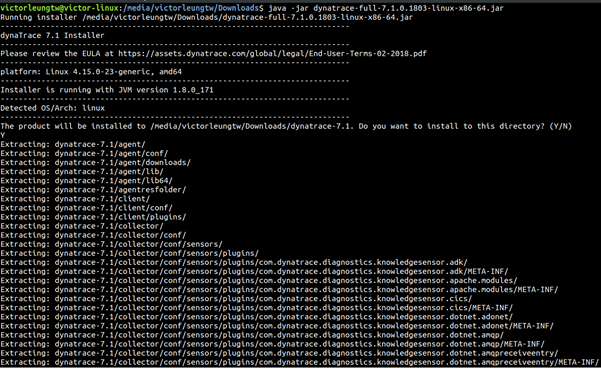
Second, install the new AppMon 7.1 version. For Linux, run the command:

java -jar dynatrace-full-7.1.0.1803-linux-x86–64.jar

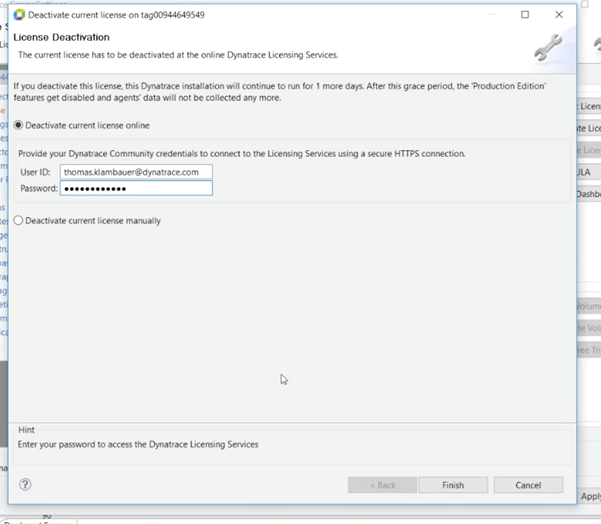
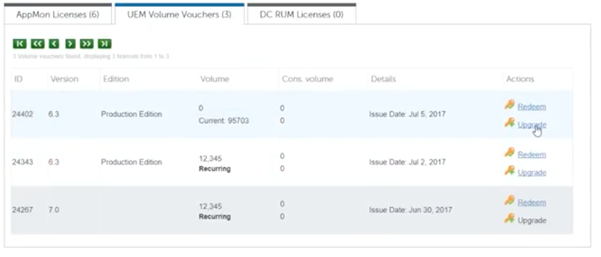
Then deactivate and upgrade the licenses. This will place your server into a grace period before shutting it down.

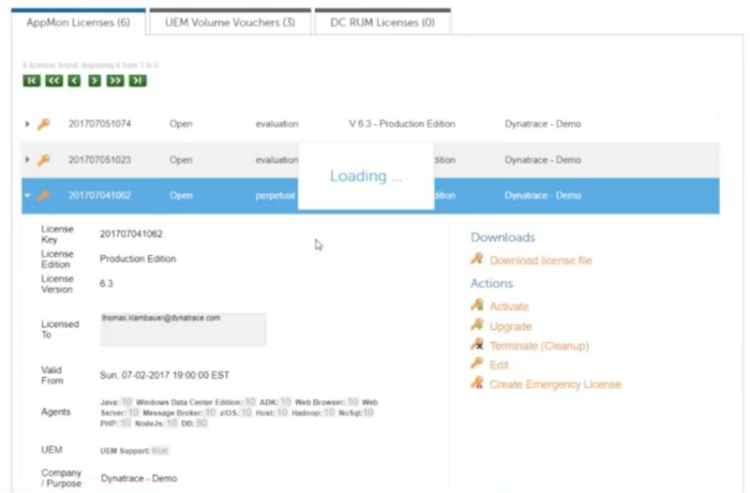
Click on the "Upgrade" button for the license.

And for the vouchers as well:

Third, shut down the old version 6.5 collector, server, and front-end server. This would be an ideal time to create backups, including those for the Performance Warehouse DB and Session Store.

Fourth, use the migration tool that can be downloaded from here.

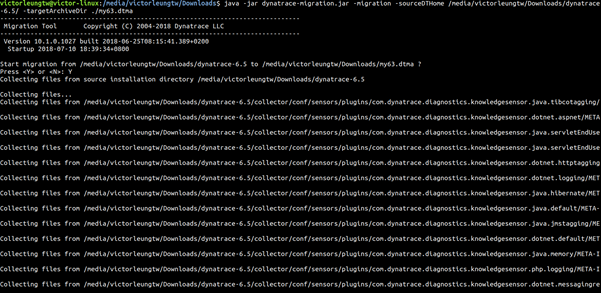
Run the command:

java -jar dynatrace-migration.jar -migration -sourceDTHome "<DT_HOME_OLD>" -targetArchiveDir "<ARCHIVE_DIR>"

Here, DT_HOME_OLD is the old AppMon installation path and ARCHIVE_DIR is the backup directory. Note that on a Windows machine, administrator rights are needed to perform this step.

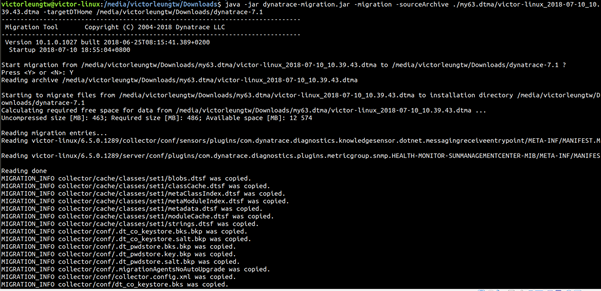
Next, move the backup files to the new 7.1 installation using the command:

java -jar dynatrace-migration.jar -migration -sourceArchive "<ARCHIVE_DIR>/<MIGRATION_ARCHIVE>" -targetDTHome "<DT_HOME_NEW>"

Where ARCHIVE_DIR/MIGRATION_ARCHIVE is the location of the ./dtma file and DT_HOME_NEW is the path for the new Dynatrace 7.1 installation.

Then register and auto-start any additional collector instances.

Fifth, start the new components like the collector and the front-end server.

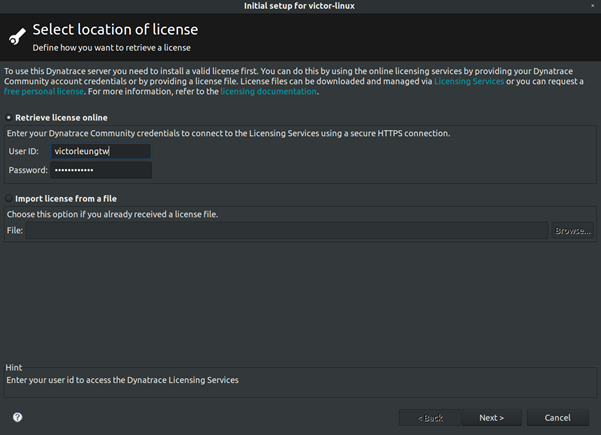
The client migration step can usually be skipped, and you can activate licenses for the new servers:

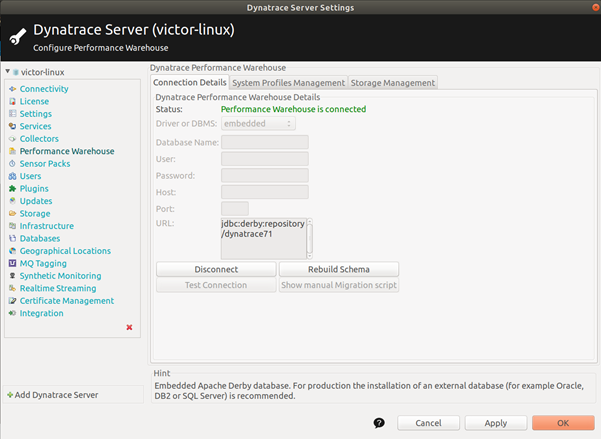
Finally, double-check the settings on the server to ensure that the Performance Warehouse and session storage have been migrated and connected.

It's also recommended to restart and update the agent. Last but not least, check and validate that everything is working as expected.

Please let me know if you have any questions.

Upgrade AppMon from Version 6.5 to 7.1

Hello and welcome to another episode of Continuous Improvement, the podcast where we explore tips and strategies to enhance your professional journey. I'm your host, Victor, and today we will be discussing the process of upgrading Dynatrace AppMon from version 6.5 to 7.1.

Dynatrace AppMon is a powerful performance data gathering tool that many professionals rely on for troubleshooting applications. This version upgrade not only brings new features but also introduces a new user interface dashboard.

So, let's dive in!

Before you begin the upgrade process, it's crucial to consult the system requirements. Ensure that your hardware and operating system meet the necessary specifications. You can find the latest system requirements for AppMon in our blog post titled "System Requirements April 2018".

Additionally, make sure you have a 64-bit client and sufficient disk space. If you're using a legacy Java Virtual Machine (JVM), please note that our help desk may not be able to assist you with any potential issues.

Now, let's get to the steps you need to follow for a successful upgrade.

Step one: Move the session storage location out of the installation directory. It's highly recommended to back up both the session storage and configuration data before proceeding. For detailed instructions, refer to the component compatibility matrix available on our website.

Step two: Install the new AppMon 7.1 version. For Linux users, the installation command is "java -jar dynatrace-full-7.1.0.1803-linux-x86–64.jar". This command will get you started on the upgrade journey.

Now, it's time to deactivate and upgrade the licenses. This process ensures a smooth transition to the new version. Remember to click on the "Upgrade" button for the license and vouchers as well.

Step three: It's time to shut down the old version 6.5 collector, server, and front-end server. This is an excellent opportunity to create backups, including those for the Performance Warehouse DB and Session Store. Don't overlook this step to safeguard your data.

Moving on to step four: You will need to utilize the migration tool for a seamless upgrade experience. You can find the download link for the migration tool in our blog post. Once downloaded, execute the following command: "java -jar dynatrace-migration.jar -migration -sourceDTHome "" -targetArchiveDir "". Please note that on a Windows machine, you'll require administrator rights for this step.

After executing the migration command, move the backup files to the new 7.1 installation using the command: "java -jar dynatrace-migration.jar -migration -sourceArchive "/" -targetDTHome "". In this command, represents the location of the .dtma file, and denotes the path for the new Dynatrace 7.1 installation.

Step five: Register and auto-start any additional collector instances you may have. This ensures a smooth transition to the upgraded version.

Finally, start the new components such as the collector and the front-end server. You can skip the client migration step in most cases and proceed to activating licenses for the new servers. Remember to double-check the settings on the server to ensure that both the Performance Warehouse and session storage have been migrated and connected.

As a final step, it's always a good idea to restart and update the agent. This helps to ensure compatibility and optimal performance. Don't forget to thoroughly test and validate that everything is working as expected.

And there you have it! The step-by-step guide to upgrading Dynatrace AppMon from version 6.5 to 7.1. If you have any questions or need further assistance, please feel free to reach out. We're here to help.

Thank you for tuning in to this episode of Continuous Improvement. I'm your host, Victor, signing off. Stay tuned for more exciting episodes coming your way!

將 AppMon 從版本 6.5 升級到 7.1

我正在將Dynatrace AppMon從版本6.5升級到7.1。AppMon是許多客戶信任的效能數據收集工具;它幫助開發者在應用系統中解決問題。此版本升級包括新功能和新的UI儀表板。以下是指導你完成此過程的步驟:

首先,重要的是要諮詢硬體和作業系統的系統需求2018年4月系統需求。例如,如果你在運行一個過時的Java虛擬機(JVM),幫助台可能無法協助你解決問題。確保你有一個64位的客戶端和足夠的磁盤空間。

此外,在開始之前,將會話存儲位置移出安裝目錄。建議備份會話存儲和配置數據。務必在此之前諮詢元件兼容性矩陣元件兼容性

其次,安裝新的AppMon 7.1版本。對於Linux,運行命令:

java -jar dynatrace-full-7.1.0.1803-linux-x86–64.jar

然後停用並升級許可證。這將在關閉它之前把你的服務器放在一個寬限期內。

點擊許可證的“升級”按鈕。

以及優惠券的升級按鈕:

第三,關閉舊版6.5的收集器、服務器和前端服務器。這將是創建備份的理想時機,包括性能倉庫數據庫和會話存儲的備份。

第四,使用這裡下載的移植工具。

運行命令:

java -jar dynatrace-migration.jar -migration -sourceDTHome "<DT_HOME_OLD>" -targetArchiveDir "<ARCHIVE_DIR>"

此處,DT_HOME_OLD是舊版AppMon的安裝路徑,ARCHIVE_DIR是備份目錄。請注意,在Windows機器上,需要管理員權限才能執行此步驟。

接著,使用以下的命令將備份檔案移動到新的7.1安裝版:

java -jar dynatrace-migration.jar -migration -sourceArchive "<ARCHIVE_DIR>/<MIGRATION_ARCHIVE>" -targetDTHome "<DT_HOME_NEW>"

其中,ARCHIVE_DIR/MIGRATION_ARCHIVE./dtma檔案的位置,DT_HOME_NEW則是新Dynatrace 7.1安裝的路徑。

然後註冊並自動啟動任何額外的收集器實例。

第五,啟動新的元件,例如收集器和前端服務器。

客戶端移植步驟通常可以跳過,並且您可以為新的伺服器啟動許可證:

最後,再次檢查伺服器上的設定以確保性能倉庫和會話存儲已被遷移並連接。

還建議重新啟動並更新代理。最後但並非最不重要的,檢查並確認所有的東西都按預期運行。

如有任何問題,請告訴我。

AWS Cognito User Pools with Mobile SDK for iOS Using Custom Challenge

I recently integrated an AWS Cognito User Pool into an iOS application. The sign-in feature utilizes a custom challenge for authentication. However, there is limited documentation on how to use the iOS SDK for this purpose. After several trials and errors, I finally succeeded in signing in. Below are the steps to accomplish this:

Step 1: Create a CognitoUserPool

In the AppDelegate, after didFinishLaunchingWithOptions, the user pool is initialized as follows:

func application(_ application: UIApplication, didFinishLaunchingWithOptions launchOptions: [UIApplication.LaunchOptionsKey: Any]?) -> Bool {

  // Set up service configuration
  let serviceConfiguration = AWSServiceConfiguration(region: CognitoIdentityUserPoolRegion, credentialsProvider: nil)

  // Create pool configuration
  let poolConfiguration = AWSCognitoIdentityUserPoolConfiguration(clientId: CognitoIdentityUserPoolAppClientId, clientSecret: nil, poolId: CognitoIdentityUserPoolId)

  // Initialize user pool client
  AWSCognitoIdentityUserPool.register(with: serviceConfiguration, userPoolConfiguration: poolConfiguration, forKey: AWSCognitoUserPoolsSignInProviderKey)

  // Fetch the user pool client we initialized in the above step
  let pool = AWSCognitoIdentityUserPool(forKey: AWSCognitoUserPoolsSignInProviderKey)

  self.storyboard = UIStoryboard(name: "Main", bundle: nil)

  pool.delegate = self

  return true
}

Step 2: Implement the Protocol Delegate

extension AppDelegate: AWSCognitoIdentityCustomAuthentication {

  func didCompleteStepWithError(_ error: Error?) {

  }

  func getCustomChallengeDetails(_ authenticationInput: AWSCognitoIdentityCustomAuthenticationInput, customAuthCompletionSource: AWSTaskCompletionSource<AWSCognitoIdentityCustomChallengeDetails>) {

  }

  func startCustomAuthentication() -> AWSCognitoIdentityCustomAuthentication {
    if self.navigationController == nil {
      self.navigationController = self.storyboard?.instantiateViewController(withIdentifier: "signinController") as? UINavigationController
    }

    if self.signInViewController == nil {
      self.signInViewController = self.navigationController?.viewControllers[0] as? SignInViewController
    }

    DispatchQueue.main.async {
      self.navigationController!.popToRootViewController(animated: true)

      if !self.navigationController!.isViewLoaded || self.navigationController!.view.window == nil {
        self.window?.rootViewController?.present(self.navigationController!, animated: true, completion: nil)
      }
    }

    return self.signInViewController!
  }
}

Step 3: Handle the Custom Challenge Inside the Sign-In View Controller

extension SignInViewController: AWSCognitoIdentityCustomAuthentication {

  func getCustomChallengeDetails(_ authenticationInput: AWSCognitoIdentityCustomAuthenticationInput, customAuthCompletionSource: AWSTaskCompletionSource<AWSCognitoIdentityCustomChallengeDetails>) {

    let authDetails = AWSCognitoIdentityCustomChallengeDetails(challengeResponses: ["USERNAME": "YourUserName", "ANSWER": "123456"])
    customAuthCompletionSource.set(result: authDetails)
  }

  public func didCompleteStepWithError(_ error: Error?) {
    DispatchQueue.main.async {
      if let error = error as? NSError {
        print("error")
      } else {
        print("success")
        self.dismiss(animated: true, completion: nil)
      }
    }
  }
}

Step 4: Access User Attributes After Successful Sign-In

self.user?.getDetails().continueOnSuccessWith { (task) -> AnyObject? in
  DispatchQueue.main.async(execute: {
    self.response = task.result

    // Display user details
    print(response)
  })

  return nil
}

If you have any questions, please feel free to ask. I hope AWS updates the documentation and provides sample code to make it easier to understand the SDK without having to resort to trial and error.

AWS Cognito User Pools with Mobile SDK for iOS Using Custom Challenge

Welcome back, everyone, to another episode of Continuous Improvement, the podcast where we explore various challenges and solutions encountered in the world of technology. I'm your host, Victor, and today we'll be diving into the topic of integrating an AWS Cognito User Pool into an iOS application.

A couple of weeks ago, I faced this very challenge while working on an iOS app. The sign-in feature required a custom challenge for authentication, but I found that there was limited documentation available on how to use the iOS SDK for this purpose. After a series of trials and errors, I finally managed to crack the code and get it working. Today, I'll be sharing the steps I took to accomplish this, hoping to make it easier for others facing a similar situation.

[SFX TRANSITION]

Step one involves creating a Cognito User Pool. In the AppDelegate, after didFinishLaunchingWithOptions, I initialized the user pool as follows:

[CODE EXAMPLE]

Here, we set up the service configuration and create the pool configuration using the appropriate values. Initializing the user pool client is crucial, and we fetch the initialized user pool client for later use. Additionally, don't forget to set the delegate of the user pool to self.

[SFX TRANSITION]

Step two involves implementing the protocol delegate. This is done through an extension of the AppDelegate class that conforms to the AWSCognitoIdentityCustomAuthentication protocol.

[CODE EXAMPLE]

Inside this extension, we implement three functions: didCompleteStepWithError, getCustomChallengeDetails, and startCustomAuthentication. These functions play a crucial role in handling the custom authentication flow. The startCustomAuthentication function ensures that the sign-in view controller is presented to the user when custom authentication is required.

[SFX TRANSITION]

Step three takes us inside the sign-in view controller. We need to handle the custom challenge within this view controller, and we do so by extending the SignInViewController class to conform to AWSCognitoIdentityCustomAuthentication.

[CODE EXAMPLE]

As you can see, we implement the getCustomChallengeDetails function, where we provide the necessary challenge responses. This is where the user's username and answer are set.

[SFX TRANSITION]

Lastly, step four allows us to access the user attributes after a successful sign-in. After the user signs in, we can use the following code snippet to retrieve and display their details.

[CODE EXAMPLE]

By calling getDetails on the user object, we can fetch the user's details and display them accordingly.

[SFX TRANSITION]

And there you have it—a simplified walkthrough of integrating an AWS Cognito User Pool with custom authentication into an iOS application. While the lack of documentation can be frustrating, I hope the steps I've provided will help save you some time and effort.

[SFX TRANSITION]

As always, if you have any questions or need further clarification on any of the steps, please feel free to reach out to me. We can chat about it on Twitter using the handle @ContinuousImp, or you can visit our website, ContinuousImprovementPodcast.com, to access additional resources.

That's it for today's episode of Continuous Improvement. Thank you for tuning in, and remember, no matter how challenging the journey, the key is to keep improving. Until next time!