Skip to content

2020

How to Fix the "Access Denied" Error in an AWS Amplify Angular App

Welcome back to Continuous Improvement, the podcast where we explore tips and tricks for enhancing your software development experience. I'm your host, Victor. In today's episode, we'll be discussing a common issue encountered when deploying an Angular app on AWS Amplify.

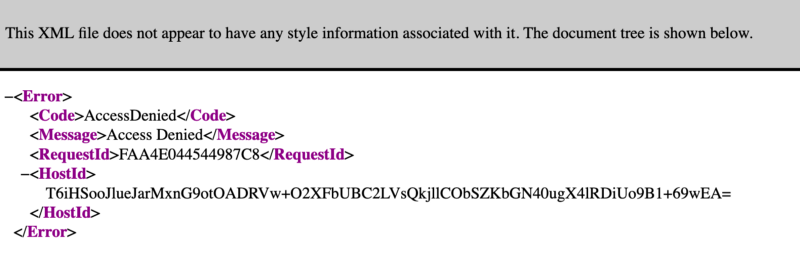
Have you ever deployed an Angular app on AWS Amplify and faced an "Access Denied" error when trying to access a defined path in your router? Well, fear not, because I have a solution for you.

The first step to resolving this issue is navigating to the AWS Console. Once you're there, select "Rewrites and Redirects" in your Amplify app settings.

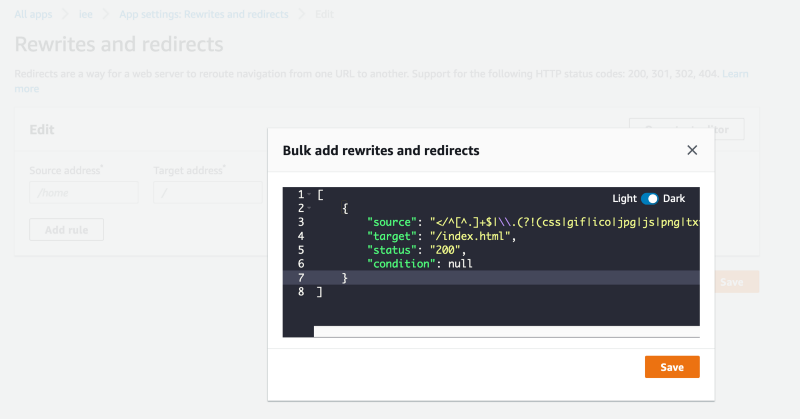
Now, in order to allow access to the defined path, we'll need to add a new rewrite and redirect rule. Click on "Open Text Editor."

Here comes the crucial part: inserting the correct rewrite and redirect rule. Don't worry, I'll provide you with the necessary code.

In the text editor, paste the following code:

[
    {
        "source": "</^[^.]+$|\\.(?!(css|gif|ico|jpg|js|png|txt|svg|woff|ttf)$)([^.]+$)/>",
        "target": "/index.html",
        "status": "200",
        "condition": null
    }
]

This code snippet will ensure that any request to your defined path is redirected to the index.html file, allowing access without encountering the "Access Denied" error.

After you've added this rule, give it a try by accessing your URL again. Voila! It should now work as expected, and you can navigate to your defined path without any issues.

And that's it for today's episode of Continuous Improvement. Remember, don't let deployment challenges hinder your development progress. Stay tuned for more valuable tips and tricks to enhance your software development journey.

Thank you for listening to Continuous Improvement. I'm your host, Victor, and until next time, keep improving!

如何修復 AWS Amplify Angular App 中的“拒絕存取”錯誤

當您在 AWS Amplify 上部署您的 Angular 應用程式時,第一個登陸頁面可以正常載入。然而,如果您在您的路由器中定義了一條路徑並嘗試存取它,您可能會遇到一個“拒絕存取”的錯誤:

要解決這個問題,首先導航至 AWS 控制台,然後選擇“重寫和重定向”。接著,加入一條新的重寫和重定向規則。點擊“開啟文字編輯器”並插入以下的規則:

[
  {
    "source": "</^[^.]+$|\\.(?!(css|gif|ico|jpg|js|png|txt|svg|woff|ttf)$)([^.]+$)/>",
    "target": "/index.html",
    "status": "200",
    "condition": null
  }
]

添加這條規則後,嘗試再次存取您的 URL。現在應該可以按預期工作了。

Writing Your Android App to Run in Background Mode as a Service

In some scenarios, you might face an issue where your app's functionality is lost after several minutes when users place it in background mode or lock their screens. This can lead to poor user experience, such as Bluetooth devices disconnecting from your app or data sync to the server getting interrupted. Users may then complain about the connectivity and stability of your app.

First, to address this issue, you need to understand the Android app Activity lifecycle. When a user switches to another app, like Facebook, instead of using yours, your app's activity is terminated and the onDestroy() method is triggered. While this behavior is beneficial for the Android system as it helps free up unused memory and manage battery life, it can be problematic for your app because its states and functionalities get lost.

The next step is to refactor your app to separate background functionalities, like Bluetooth connectivity, into a service. A service is an application component capable of performing long-running operations in the background, independent of the user interface. Here's a code example for a service:

import android.app.Service

class MyService : Service() {

    override fun onBind(intent: Intent): IBinder? {
        return null
    }

    override fun onCreate() {
      // Place your service logic here
    }

    override fun onDestroy() {
      // Clean up your service logic here
    }

}

To use this service, you also need to define it in your AndroidManifest.xml. Here is an example (replace the name with your service's package name):

<application>
    ...
    <service android:enabled="true" android:name="com.victorleungtw.myapp.services.MyService"></service>
</application>

Furthermore, to start this service in your activity (for example, in Activity.onCreate()), add the following line:

startService(Intent(this, MyService::class.java))

And where you wish to stop the service, include this line:

stopService(Intent(this, MyService::class.java))

After implementing these changes, your app will be better structured but won't yet be able to run indefinitely in the background. To achieve that, you also need to add two more methods within your service:

class MyService : Service() {
    // ... existing code

    @RequiresApi(Build.VERSION_CODES.O)
    override fun onStartCommand(intent: Intent?, flags: Int, startId: Int): Int {
        val channelId =
                if (Build.VERSION.SDK_INT >= Build.VERSION_CODES.O) {
                    createNotificationChannel("my_service", "My Background Service")
                } else {
                    // If it's an earlier version, the channel ID is not used
                    ""
                }

        val notification: Notification = Notification.Builder(this, channelId)
                .setContentTitle("Title")
                .setContentText("Text")
                .build()
        startForeground(2001, notification)

        return START_STICKY
    }

    @RequiresApi(Build.VERSION_CODES.O)
    private fun createNotificationChannel(channelId: String, channelName: String): String {
        val channel = NotificationChannel(channelId,
                channelName, NotificationManager.IMPORTANCE_NONE)
        channel.lightColor = Color.BLUE
        channel.lockscreenVisibility = Notification.VISIBILITY_PRIVATE
        val service = getSystemService(Context.NOTIFICATION_SERVICE) as NotificationManager
        service.createNotificationChannel(channel)
        return channelId
    }
}

Here, a notification is created to inform the user that the app continues to run in the background. It might look something like this:

That's it. Now your users can multitask—like browsing Facebook—while your app continues to run in the background, maintaining Bluetooth connectivity, syncing user data, playing music, or performing other tasks depending on your app's features.

Writing Your Android App to Run in Background Mode as a Service

Welcome back to another episode of Continuous Improvement, the podcast where we explore tips and strategies to enhance your app development skills. I'm your host, Victor. In today's episode, we're going to talk about a common issue that many developers face – maintaining app functionality in the background. Have you ever experienced your app losing its functionality when users switch to other apps or lock their screens? It can be quite frustrating, right? Well, worry no more because we have some solutions for you!

But before we dive into that, let's quickly talk about the Android app Activity lifecycle. When a user switches away from your app, the activity is terminated, and the onDestroy() method is triggered. While this behavior is necessary for memory management and battery life, it can cause your app's states and functionalities to be lost.

To overcome this challenge, we recommend refactoring your app by separating background functionalities into a service. A service is an application component capable of performing long-running operations in the background, independent of the user interface.

Let me give you an example of how to create a service in Kotlin:

import android.app.Service

class MyService : Service() {

    override fun onBind(intent: Intent): IBinder? {
        return null
    }

    override fun onCreate() {
      // Place your service logic here
    }

    override fun onDestroy() {
      // Clean up your service logic here
    }

}

Once you've created your service, remember to define it in your AndroidManifest.xml file to ensure it is recognized by the system:

<application>
    ...
    <service android:enabled="true" android:name="com.victorleungtw.myapp.services.MyService"></service>
</application>

Now, if you want to start the service in your activity, simply add this line of code:

startService(Intent(this, MyService::class.java))

And, to stop the service, include this line:

stopService(Intent(this, MyService::class.java))

These changes will improve the structure of your app, but your app still won't be able to run indefinitely in the background. To achieve that, you need to add two more methods within your service. Here's an example:

class MyService : Service() {
    // ... existing code

    @RequiresApi(Build.VERSION_CODES.O)
    override fun onStartCommand(intent: Intent?, flags: Int, startId: Int): Int {
        val channelId =
                if (Build.VERSION.SDK_INT >= Build.VERSION_CODES.O) {
                    createNotificationChannel("my_service", "My Background Service")
                } else {
                    // If it's an earlier version, the channel ID is not used
                    ""
                }

        val notification: Notification = Notification.Builder(this, channelId)
                .setContentTitle("Title")
                .setContentText("Text")
                .build()
        startForeground(2001, notification)

        return START_STICKY
    }

    @RequiresApi(Build.VERSION_CODES.O)
    private fun createNotificationChannel(channelId: String, channelName: String): String {
        val channel = NotificationChannel(channelId,
                channelName, NotificationManager.IMPORTANCE_NONE)
        channel.lightColor = Color.BLUE
        channel.lockscreenVisibility = Notification.VISIBILITY_PRIVATE
        val service = getSystemService(Context.NOTIFICATION_SERVICE) as NotificationManager
        service.createNotificationChannel(channel)
        return channelId
    }
}

By creating a notification, you can inform users that your app continues to run in the background. This notification can be customized to match your app's branding and provide relevant information.

With these changes, your app can now run seamlessly in the background, maintaining functionalities like Bluetooth connectivity, data syncing, or playing music.

And that brings us to the end of today's episode of Continuous Improvement. I hope you found these tips helpful in enhancing your app's functionality in the background. Remember, a seamless user experience is crucial for app success. If you have any questions or suggestions for future episodes, feel free to reach out to me. Until then, keep coding and keep improving!

如何將您的Android應用程式寫入後台執行模式作為服務

在某些情況下,您可能會遇到一個問題,那就是當用戶將應用程式置於背景模式或鎖定屏幕後幾分鐘,您的應用程式的功能就會消失。這可能導致用戶體驗變差,例如藍牙設備從您的應用程式中斷開,或者數據同步到服務器中斷。用戶可能會抱怨您的應用程式的連接性和穩定性。

首先,為了解決這個問題,您需要了解Android應用程式活動生命周期。當用戶切換到另一個應用程式,例如Facebook,而不是使用您的,您的應用程式活動將被終止,並觸發 onDestroy() 方法。然而,這種行為對於Android系統是有利的,因為它可以幫助釋放未使用的記憶體和管理電池壽命,但對於您的應用程式來說,可能會有問題,因為其狀態和功能可能會丟失。

下一步是重構您的應用程式,將如藍牙連接等背景功能分離為服務。服務是一種應用程式組件,能夠在後台執行持久運作,獨立於使用者介面。下面是一個服務的代碼範例:

import android.app.Service

class MyService : Service() {

    override fun onBind(intent: Intent): IBinder? {
        return null
    }

    override fun onCreate() {
      // 在此擺放你的服務邏輯
    }

    override fun onDestroy() {
      // 在此清理你的服務邏輯
    }

}

要使用此服務,您還需要在您的 AndroidManifest.xml 中定義它。這是一個例子(將名稱替換為您的服務的套件名稱):

<application>
    ...
    <service android:enabled="true" android:name="com.victorleungtw.myapp.services.MyService"></service>
</application>

此外,要在您的活動中啟動此服務(例如在 Activity.onCreate() 中),請添加以下行:

startService(Intent(this, MyService::class.java))

並在您希望停止服務的地方,包括此行:

stopService(Intent(this, MyService::class.java))

實施這些更改後,您的應用程式將有更好的結構,但還不能在背景中無限期運行。為了實現這一點,您還需要在您的服務中添加兩個方法:

class MyService : Service() {
    // ... 現有的代碼

    @RequiresApi(Build.VERSION_CODES.O)
    override fun onStartCommand(intent: Intent?, flags: Int, startId: Int): Int {
        val channelId =
                if (Build.VERSION.SDK_INT >= Build.VERSION_CODES.O) {
                    createNotificationChannel("my_service", "My Background Service")
                } else {
                    // 如果是較早的版本,則不使用頻道ID
                    ""
                }

        val notification: Notification = Notification.Builder(this, channelId)
                .setContentTitle("Title")
                .setContentText("Text")
                .build()
        startForeground(2001, notification)

        return START_STICKY
    }

    @RequiresApi(Build.VERSION_CODES.O)
    private fun createNotificationChannel(channelId: String, channelName: String): String {
        val channel = NotificationChannel(channelId,
                channelName, NotificationManager.IMPORTANCE_NONE)
        channel.lightColor = Color.BLUE
        channel.lockscreenVisibility = Notification.VISIBILITY_PRIVATE
        val service = getSystemService(Context.NOTIFICATION_SERVICE) as NotificationManager
        service.createNotificationChannel(channel)
        return channelId
    }
}

在這裡,創建了一個通知,通知用戶該應用程式繼續在背景中運行。它可能看起來像這樣:

就是這樣。現在您的用戶可以進行多任務操作,例如瀏覽Facebook,同時您的應用程式繼續在後台運行,保持藍牙連接,同步用戶數據,播放音樂或執行其他取決於您的應用程式功能的任務。

Caveats with Android In-App Browsers

When you're developing a web application, you need to take browser compatibility issues into account. I encountered a problem with an Android in-app browser that wasn't tested during development but manifested in production, leading to thousands of failed transactions. There were no clear logs to pinpoint the root cause, so it took me some time to figure it out. I'm documenting this issue here in hopes of saving you some future troubleshooting time.

When your end-users access your web app through a third-party Android in-app browser, you have no control over this webView as it is provided by the third party. If the setJavaScriptEnabled method is set to false, you're essentially at a dead-end. If you're lucky enough for the frontend code to still load, note that the setDomStorageEnabled setting is false by default. If you refer to the official documentation:

Android WebSettings setDomStorageEnabled Method

This boolean flag sets whether the DOM storage API is enabled or not. The default value is false, which means the WebView will disable the DOM storage API. This setting can halt your code execution when it tries to access the localStorage object in the browser.

MDN Web Docs on localStorage

The solution is simple: add a condition to check whether localStorage is available before proceeding with the code. This issue doesn't produce a meaningful error message, making troubleshooting particularly challenging, especially when you have to simulate the problem within an Android in-app browser.

One tip for replicating the issue is to download the following tool:

Android WebView Test App on Google Play

This app is quite useful, as it allows you to view console logs within the Android in-app browser.

Another tip for troubleshooting via server logs is to examine the request header's User-Agent Strings. You can identify WebView requests by looking for the wv field in the example header below:

Mozilla/5.0 (Linux; Android 5.1.1; Nexus 5 Build/LMY48B; wv) AppleWebKit/537.36 (KHTML, like Gecko) Version/4.0 Chrome/43.0.2357.65 Mobile Safari/537.36

I hope this article helps you and saves you time dealing with this particular caveat.

Caveats with Android In-App Browsers

Welcome back to another episode of Continuous Improvement, the podcast dedicated to helping developers troubleshoot and improve their web applications. I'm your host, Victor, and today we're going to discuss a common browser compatibility issue that can cause headaches during development.

Picture this scenario: you've developed a web application, thoroughly tested it on different browsers, and deployed it to production. But unexpectedly, you encounter a problem specifically with Android in-app browsers that was not caught during development. Thousands of failed transactions start pouring in, leaving you scratching your head.

In today's episode, I want to share my own experience with this issue, hoping to save you valuable troubleshooting time in the future.

The problem lies in the webView of third-party Android in-app browsers, which you have no control over. If the setJavaScriptEnabled method is set to false, you'll find yourself at a dead-end. But even if the frontend code still manages to load, you might run into another obstacle - the setDomStorageEnabled setting is false by default.

To shed some light on this, let's head over to the official Android documentation. According to the documentation for the setDomStorageEnabled method, this boolean flag determines whether the DOM storage API is enabled or not. By default, it's set to false, effectively disabling the DOM storage API. And here's where the trouble begins if your code relies on accessing the localStorage object.

The localStorage object is widely used in web applications to store data locally, but if it's not available due to the disabled DOM storage API, your code execution can come to a screeching halt. The problem is, this issue doesn't produce a clear error message, making troubleshooting particularly challenging, especially within the Android in-app browser environment.

Fortunately, there's a simple solution. You can add a condition to check if localStorage is available before proceeding with your code. By doing this, you can handle the situation gracefully and avoid unexpected errors.

Now, you might be wondering how to replicate this issue and test your solution. One useful tool for this is the Android WebView Test App available on the Google Play Store. This app allows you to view console logs within the Android in-app browser, giving you valuable insights into any errors or issues that may arise.

Additionally, if you're troubleshooting via server logs, examining the request header's User-Agent Strings can be helpful. Look for the wv field in the User-Agent String to identify WebView requests specifically. This information can assist in narrowing down the problematic requests and provide a starting point for further investigation.

In conclusion, web application development is not without its challenges, and browser compatibility is one of the crucial aspects to consider. Android in-app browsers can present unexpected issues, especially when it comes to the settings related to JavaScript and DOM storage.

By being aware of this particular issue and implementing a simple condition to check for the availability of localStorage, you can anticipate and tackle the problem head-on, saving yourself valuable troubleshooting time.

That's all for today's episode of Continuous Improvement. I hope you found this discussion helpful. As always, stay curious, stay resilient, and keep pushing the boundaries of your web development skills.

Android應用內瀏覽器的注意事項

當您正在開發一個網頁應用時,您需要考慮到瀏覽器的兼容性問題。我在開發過程中並未對Android應用內瀏覽器進行測試,但在正式上線以後出現了問題,導致數千次的交易失敗。我並不能從日誌中清楚地找出問題的根源,因此我花了一些時間來解決。我在這裡記錄下了這個問題,希望可以節省您未來的除錯時間。

當您的終端用戶透過第三方的Android應用內瀏覽器來訪問您的網頁應用時,您無法控制這個webView,因為它是由第三方提供的。如果setJavaScriptEnabled方法設置為false,那麼您就陷入了絕境。如果你有幸使前端代碼依舊能加載,請注意setDomStorageEnabled的設置預設為false。如果您參考官方文檔:

Android WebSettings setDomStorageEnabled Method

這個布爾標誌設定DOM存儲API是否啟用。預設值為false,表示WebView將停用DOM存儲API。當它嘗試訪問瀏覽器中的localStorage對象時,此設定可能會阻止您的代碼執行。

MDN Web Docs on localStorage

解決方案很簡單:在執行代碼之前,添加一個條件來檢查localStorage是否可用。這個問題不會產生有意義的錯誤消息,使得除錯變得特別困難,尤其是當您需要在Android應用內瀏覽器中模擬問題時。

複製此問題的一個技巧是下載以下工具:

Android WebView Test App on Google Play

此應用程式非常實用,因為它可以讓您在Android應用內瀏覽器中查看控制台日誌。

另一個通過服務器日誌進行故障排除的技巧是檢查請求頭部的User-Agent Strings。您可以通過檢查下面的範例頭部中的wv字段來識別WebView的請求:

Mozilla/5.0 (Linux; Android 5.1.1; Nexus 5 Build/LMY48B; wv) AppleWebKit/537.36 (KHTML, like Gecko) Version/4.0 Chrome/43.0.2357.65 Mobile Safari/537.36

我希望這篇文章能對您有所幫助,並節省您處理這一特殊注意事項所需的時間。

Explaining the Angular Error: 'Expression Changed After It Has Been Checked'

One of my colleagues encountered an error message while developing an Angular frontend application. The error message read:

ExpressionChangedAfterItHasBeenCheckedError: Expression has changed after it was checked. Previous value: 'null', Current value: 'true'.

This error occurred while he was developing a back button feature that navigates from the second page to the first. The first page had already been rendered once and needed to be re-rendered with different initial values.

The root cause of this error lies in Angular's change detection mechanism. After each operation, Angular stores the values it used for that operation in the component view's oldValues property. Once all components have been checked, Angular initiates the next digest cycle. However, instead of performing operations, it compares the current values with those stored from the previous cycle.

It's worth noting that this additional level of checking only occurs in development mode. Angular enforces a unidirectional data flow from the top of the component tree to the bottom. No child component is allowed to update the properties of a parent component once the parent's changes have been processed.

To resolve the above issues, possible solutions include using asynchronous updates, such as setTimeout, or manually triggering change detection at the ngAfterViewInit() lifecycle hook with _changeDetectorRef.detectChanges(). The ChangeDetectorRef class provides the following five methods:

abstract class ChangeDetectorRef {
  abstract markForCheck(): void;
  abstract detach(): void;
  abstract detectChanges(): void;
  abstract checkNoChanges(): void;
  abstract reattach(): void;
}

By utilizing these methods, you can manually run change detection and update the child view. My colleague was pleased to find that the error was resolved following this explanation.

Explaining the Angular Error: 'Expression Changed After It Has Been Checked'

Welcome to "Continuous Improvement," the podcast where we explore tips, tricks, and valuable insights to help you enhance your development skills. I'm your host, Victor, and in today's episode, we'll be discussing a common error message that many developers encounter while working with Angular.

So, picture this: one of our colleagues is deep into developing an Angular frontend application when suddenly, an error message pops up on their screen. The message reads: "ExpressionChangedAfterItHasBeenCheckedError: Expression has changed after it was checked."

Now, this error occurred while our colleague was working on implementing a back button feature. Specifically, it happened when navigating from the second page back to the first. The first page had already been rendered once, but it needed to be re-rendered with different initial values.

The root cause of this error lies within Angular's change detection mechanism. Let me explain how it works. After performing each operation, Angular stores the values it used for that operation in the component view's oldValues property. Once all components have been checked, Angular initiates the next digest cycle. However, at this stage, instead of performing operations, it compares the current values with those stored from the previous cycle.

It's important to note that this additional level of checking only occurs in development mode. Angular enforces a unidirectional data flow from the top of the component tree to the bottom. In other words, once a parent component's changes have been processed, no child component should update the parent's properties.

Now, let's move on to possible solutions for resolving this error. One option is to use asynchronous updates, such as setTimeout, to defer the update until the next cycle. This allows Angular to process the changes without triggering the error.

Another solution involves manually triggering change detection at the ngAfterViewInit() lifecycle hook using the _changeDetectorRef.detectChanges() method. The ChangeDetectorRef class provides several methods for managing change detection, including markForCheck(), detach(), detectChanges(), checkNoChanges(), and reattach().

By utilizing these methods, you can manually run change detection and update the child view. Our colleague was pleased to find that by implementing this workaround, the error message was resolved.

In conclusion, if you come across the "ExpressionChangedAfterItHasBeenCheckedError" in your Angular development, remember that it's essential to respect Angular's unidirectional data flow. You can either use asynchronous updates or manually trigger change detection, and these methods should help you overcome the error.

That's it for today's episode of "Continuous Improvement." We hope that sharing this experience and offering practical solutions will assist you in your own development journey.

If you found this episode helpful and would like to dive deeper into the world of continuous improvement, be sure to check out our blog and subscribe to our podcast for future episodes.

Remember, growth is a continuous process, and we're here to support you every step of the way. Thanks for listening, and until next time, keep coding and keep improving.