瞭解 Kubernetes 中的日誌記錄 - 從容器到節點
日誌記錄是監控和維護應用程式的重要組成部分,尤其是在像 Kubernetes 這樣複雜的環境中。日誌能夠提供應用程式行為的寶貴見解,有助於識別錯誤、性能問題和安全威脅。然而,由於 Kubernetes 平台的動態和分散式特性,日誌記錄面臨著諸多挑戰。本篇文章將解釋 Kubernetes 中日誌的來源、日誌收集器的重要性,並比較 Fluentd、Fluent Bit 和 AWS CloudWatch Container Insights 等流行的日誌記錄解決方案。
Kubernetes 中的日誌從哪裡來?
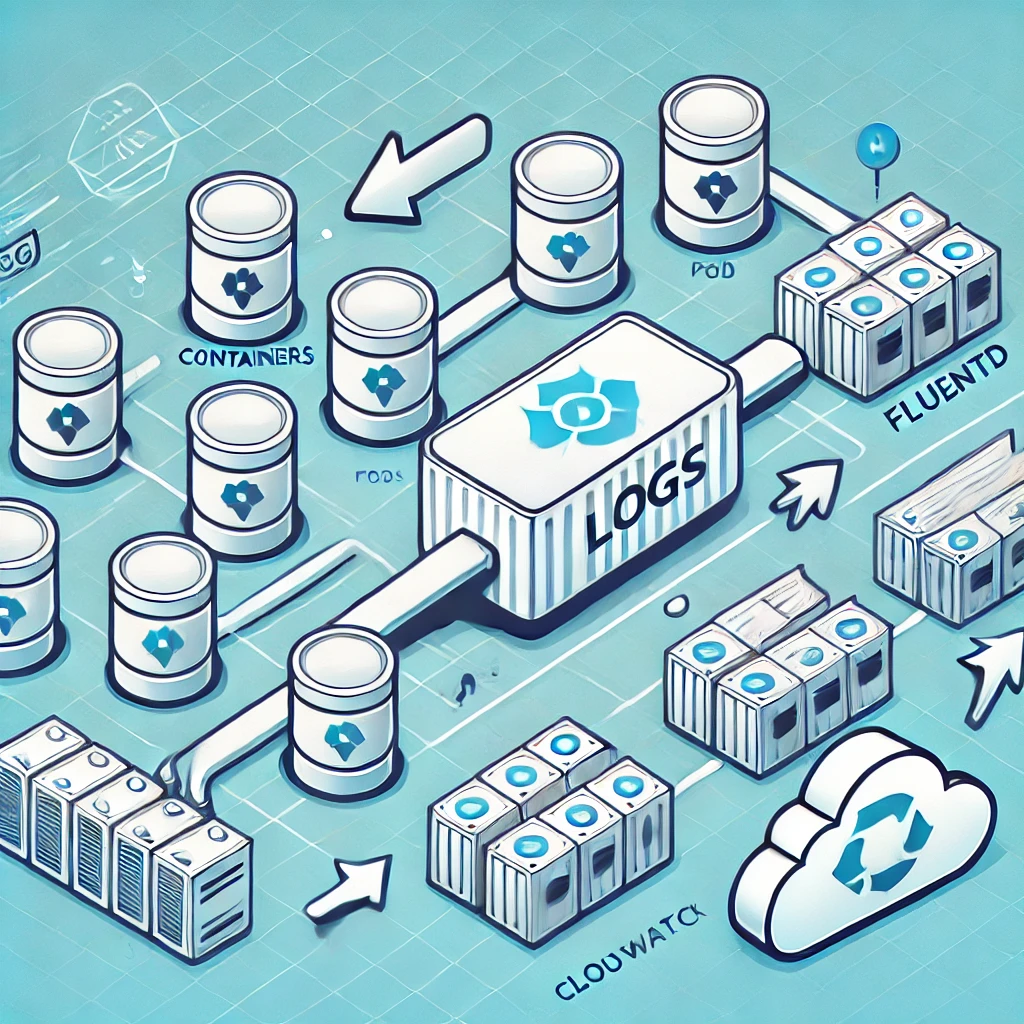
在 Kubernetes 中,日誌產生於多個層次,包括:
-
容器: 每個 Kubernetes pod 中的容器都會生成自己的日誌,這些日誌寫入到容器的標準輸出 (
stdout) 和標準錯誤 (stderr) 中。容器執行環境(如 Docker 或 containerd)負責管理這些日誌。 -
Pod: Pod 可以包含多個容器,因此會聚合來自所有容器的日誌。然而,Kubernetes 並不會自動儲存或轉發 pod 的日誌。這些日誌是臨時的,通常會在 pod 終止或重啟時消失。
-
節點: 每個 Kubernetes 節點都有一個日誌代理,負責收集該節點上運行的所有 pod 的日誌。這些日誌儲存在節點本地,但與 pod 日誌類似,如果節點故障或被替換,這些日誌也可能丟失。
為什麼不直接使用 AWS CloudWatch 來處理 EKS 的日誌?
AWS CloudWatch 是一款功能強大的工具,用於在 AWS 環境(包括 Elastic Kubernetes Service,簡稱 EKS)中進行監控和日誌記錄。雖然在 EKS 上使用 CloudWatch 似乎很方便,但在處理全面的日誌收集和處理需求時,它有一定的限制。
AWS CloudWatch 在 Kubernetes 日誌記錄中的局限性:
-
靈活性不足: CloudWatch 對於簡單的集中式日誌記錄非常有用,但在管理複雜的 Kubernetes 環境時可能缺乏所需的靈活性。它不原生支持高級的日誌解析、豐富化或過濾,這些功能在實際應用中經常需要。
-
成本管理: CloudWatch 的定價基於日誌的攝取量和儲存量。在 Kubernetes 環境中,日誌量可能呈指數級增長,這可能導致成本出乎意料地高昂,並且缺乏對數據保留和處理的足夠控制。
-
多集群聚合: Kubernetes 通常運行於多個集群之上。CloudWatch 沒有為跨集群日誌聚合設計原生支持,這可能使得獲得統一的日誌視圖變得困難。
鑑於這些挑戰,許多團隊選擇使用專門的日誌收集器來更好地控制其日誌基礎架構。
日誌收集器的必要性
日誌收集器是一種專門設計用於聚合、處理和轉發來自 Kubernetes 基礎設施中不同部分的日誌的工具。相比完全依賴 CloudWatch,日誌收集器能夠讓你:
- 高效處理日誌: 實時過濾和轉換日誌,只將必要的信息轉發至 CloudWatch 或其他日誌後端。
- 增強日誌豐富化: 通過添加 pod 標籤、命名空間或節點名稱等額外元數據來豐富日誌,讓日誌分析和搜尋變得更加容易。
- 優化成本: 通過過濾掉不相關的日誌來減少發送至 CloudWatch 的日誌量,從而降低成本。
- 集中聚合: 從多個集群收集日誌,實現更好的環境觀察能力。
流行日誌收集器的比較:Fluentd、Fluent Bit 和 AWS CloudWatch Container Insights
以下是幾款 Kubernetes 日誌記錄工具的優劣比較:
Fluentd
-
概述: Fluentd 是一款全功能的開源數據收集器,旨在統一日誌數據。它提供了多種插件來與 Elasticsearch、S3 和 CloudWatch 等系統集成。
-
優點:
- 擁有超過 500 個插件,功能非常強大。
- 支持高級日誌處理、過濾和轉換。
-
適用於大型、複雜的環境,特別是需要大量日誌處理的場景。
-
缺點:
- 資源消耗較大,因為其功能更為全面。
-
配置和調整可能比較複雜。
-
適用場景: 適用於需要複雜日誌管理和高級處理的大型 Kubernetes 集群。
Fluent Bit
-
概述: Fluent Bit 是 Fluentd 生態系統的一部分,是一個輕量級且快速的日誌處理和轉發工具。它與 Fluentd 功能相似,但資源佔用更低,適用於資源有限的環境。
-
優點:
- 輕量且快速,非常適合資源有限的環境。
- 支持與 AWS 服務集成的多種插件。
-
配置簡單,操作門檻低。
-
缺點:
- 與 Fluentd 相比,進階處理能力有限。
-
功能不如 Fluentd 豐富,因此可能無法滿足複雜的日誌處理需求。
-
適用場景: 適合輕量級日誌需求的場景,例如資源受限的 Kubernetes 集群或邊緣設備。
AWS CloudWatch Container Insights
-
概述: AWS CloudWatch Container Insights 是 AWS 提供的一項管理服務,用於從 EKS 上的容器化應用收集、聚合和可視化日誌及指標。
-
優點:
- 與 AWS 服務無縫集成,無需額外配置。
- 提供內建的 Kubernetes 日誌及指標可視化功能。
-
簡化了 AWS 原生 Kubernetes 環境的日誌收集。
-
缺點:
- 與 Fluentd 和 Fluent Bit 相比,定制性和靈活性不足。
- 隨著日誌量增加,成本可能變得高昂。
-
主要針對 AWS,缺乏多雲或本地部署的集成選項。
-
適用場景: 適用於完全依賴 AWS 生態系統的團隊,或者需要最少配置的托管日誌服務。
結論
在 Kubernetes 中進行日誌記錄不僅僅是捕獲容器輸出,還需要協調來自平台多層的日誌。AWS CloudWatch 能夠處理基本日誌記錄,但若要最大化日誌的價值,同時控制成本,通常需要專門的日誌收集器。Fluentd、Fluent Bit 和 AWS CloudWatch Container Insights 根據環境的規模和複雜性提供不同的優勢:
- Fluentd: 適用於需要廣泛日誌處理和集成的複雜環境。
- Fluent Bit: 適合資源受限的集群或需要高效日誌記錄的小型環境。
- AWS CloudWatch Container Insights: 適合希望最小化配置的 AWS 原生集成團隊。
選擇正確的日誌收集策略,可以確保 Kubernetes 集群的更佳可觀察性和性能,同時控制成本。

 嘿大家!歡迎返嚟我嘅頻道。今日我哋會傾下個大家都會遇到但唔係成日講嘅話題——即席溝通。無論喺問答環節、工面試,定係平時嘅閒聊,都要快啲諗到嘢同清楚表達自己嘅諗法,其實真係幾難㗎。
 歡迎嚟到今日嘅深入探索,我哋會探討2023年日本最受注目嘅商業書——安藤耕太嘅《數值化之鬼》。喺數碼轉型重塑各行各業嘅世界中,掌握數字思維係關鍵。請繼續睇住,等我哋揭示點解利用數字力量可以幫你喺個人同職業人生中成功。
 歡迎返嚟我哋嘅頻道,我哋喺度講改變人生嘅書同埋幫助我哋成長、成為最好嘅自己嘅理念。今日,我好興奮同大家分享幾個來自梅洛迪·貝蒂嗰本重要著作《每一天練習照顧自己 - 當我哋為自己負起責任就能真真正正放手 做自己》裏面嘅轉變性見解。呢本書強調咗一個基本真理:通往真正自由同真我嘅道路係由自我照顧同個人責任所鋪就嘅。
 "大家好,歡迎返嚟[頻道名稱]。喺呢度呢,我哋會搵啲最新最掂嘅策略,幫你最大化生產力,同埋過上最好嘅生活。今日呢,我有一個好興奮嘅主題同大家分享——啲真係可以改變我哋對生產力同成功諗法嘅革命性見解。
 嗨,大家好!歡迎回嚟我哋嘅頻道!今日,我哋會深入探討一個好刺激同埋對我哋財務健康非常重要嘅話題。冇錯,我哋會講金融投機——佢嘅歷史、影響,仲有點解理解佢對我哋所有人咁重要。我哋會從愛德華·錢斯勒嗰本令人眼界大開嘅書《魔鬼接住落後者:金融投機的歷史》入面攞啲見解。