How to Install Ubuntu Desktop on an AWS Instance Using Chrome Remote Desktop
In today's cloud-centric world, many resources have been moved to the cloud—photos, files, and servers among them. So why not your desktop environment? Imagine not needing to carry a heavy laptop. You could access your computing power from any thin client, such as a tablet with a keyboard, from anywhere. This is achievable using an AWS instance combined with Ubuntu Desktop and Chrome Remote Desktop. While there are other solutions like AWS Workspace or VNC connection, Chrome Remote Desktop offers the lowest latency and performance closest to a native desktop. Here's how to set it up:
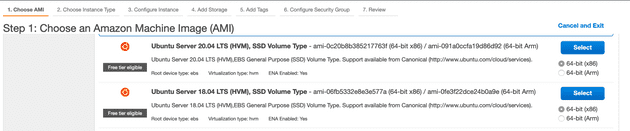
- Log in to the AWS console and launch an instance using the Ubuntu Server AMI.
- Once the instance is launched, SSH into your Ubuntu server. Update the package manager and install wget:
- Download the Chrome Remote Desktop package and install it:
wget https://dl.google.com/linux/direct/chrome-remote-desktop_current_amd64.deb
sudo dpkg --install chrome-remote-desktop_current_amd64.deb
sudo apt install --assume-yes --fix-broken
- Install the desktop GUI environment.
After testing various distributions, I found that Xfce performs best, especially over slow networks:
- Configure Chrome Remote Desktop to use Xfce by default:
sudo bash -c 'echo "exec /etc/X11/Xsession /usr/bin/xfce4-session" > /etc/chrome-remote-desktop-session'
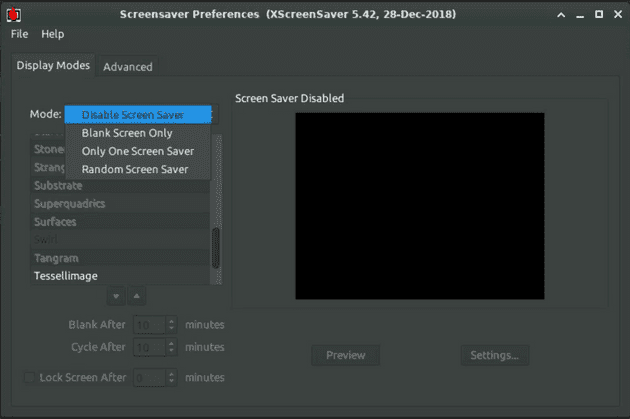
- Install xscreensaver as an alternative to the default Xfce locker, which is not compatible with remote desktop:
- Disable the display manager, as there is no display connected:
- Add your user account to the Linux group and then log out:
- On your local laptop browser, open Chrome Remote Desktop's Headless Mode. Follow the steps to set up another computer. You will probably copy a command similar to this into your AWS instance:
DISPLAY= /opt/google/chrome-remote-desktop/start-host
--code="4/xxxxxxxxxxxxxxxxxxxxxxxx"
--redirect-url="https://remotedesktop.google.com/_/oauthredirect"
--name=
-
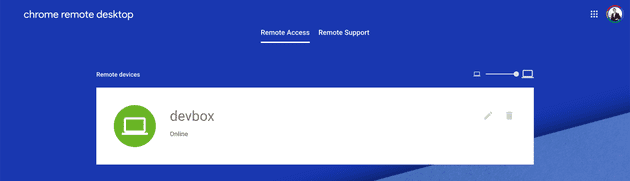
Finally, you can remotely connect to your Ubuntu desktop.
Extra tip: You can display a screensaver, although it's not necessary.
You can now access your desktop environment from anywhere, using any device. This setup is especially useful for software engineers who want access to a full set of development tools at all times.