我有一個在Ubuntu 16.04伺服器上運行Node.js和Nginx的AWS EC2實例。在這篇教程中,我將向你展示如何使用Let’s Encrypt將你的網站從HTTP轉換為HTTPS。HTTPS防止未經授權的篡改你的網站與用戶瀏覽器之間的通信。它使用傳輸層安全性(TLS)認證對這種通信進行加密。Let’s Encrypt是一個提供免費X.509證書的證書頒發機構。

首先,SSH 連接到你的 EC2 實例:
ssh -i <keyfile.pem> ubuntu@<public-ip-address>接著,將Let’s Encrypt的儲存庫複製到/opt/letsencrypt路徑:
sudo git clone https://github.com/letsencrypt/letsencrypt /opt/letsencrypt然後,透過運行以下指令來檢查是否有任何應用程式正在監聽80端口:
netstat -na | grep ':80.*LISTEN'如果返回任何進程,終止它們。例如,如果你已經有一個Nginx伺服器在80端口運行,你可能需要如下停止它:
sudo systemctl stop nginx之後,導航到你的儲存庫cd /opt/letsencrypt,並運行以下命令以獲得證書:
./letsencrypt-auto certonly --standalone --email <your@email.com> -d <domain.com> -d <subdomain.domain.com>如果你遇到像這樣的錯誤:
OSError: Command /opt/eff.org/certbot/venv/bin/python2.7 - setuptools pkg_resources pip wheel failed with error code 1然後在重新運行腳本之前設置以下環境變數:
export LC_ALL="en_US.UTF-8"
export LC_CTYPE="en_US.UTF-8"遵循屏幕上的指示,您應該在路徑/etc/letsencrypt/live/<domain.com>處獲得您的證書。
接下來,配置Nginx設置以將HTTP流量重新導向到HTTPS。使用以下命令編輯文件:
sudo vi /etc/nginx/sites-available/default內容應該像這樣(記得替換<YourDomain.com> 和你的網站的根路徑):
server {
  listen 443 ssl;
  server_name <YourDomain.com>;
  ssl_certificate /etc/letsencrypt/live/<YourDomain.com>/fullchain.pem;
  ssl_certificate_key /etc/letsencrypt/live/<YourDomain.com>/privkey.pem;
  ssl_protocols TLSv1 TLSv1.1 TLSv1.2;
  ssl_prefer_server_ciphers on;
  ssl_ciphers 'EECDH+AESGCM:EDH+AESGCM:AES256+EECDH:AES256+EDH';

  root /var/www/yourPath;
  index index.html index.htm;

  location / {
    proxy_pass http://localhost:3000/;
    proxy_http_version 1.1;
    proxy_set_header Upgrade $http_upgrade;
    proxy_set_header Connection "upgrade";
    proxy_set_header Host $http_host;
    proxy_set_header X-Real-IP $remote_addr;
    proxy_set_header X-Forwarded-For $proxy_add_x_forwarded_for;
    proxy_set_header X-Forwarded-Proto http;
    proxy_set_header X-Nginx-Proxy true;
    proxy_redirect off;
  }
}
server {
  listen 80;
  server_name <domain.com>;
  return 301 https://$host$request_uri;
}
為了測試你的配置是否有任何錯誤,運行:
sudo nginx -t如果一切正常,重啟Nginx:
sudo service nginx stop
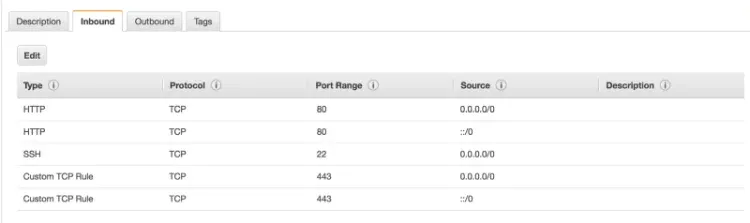
sudo service nginx start最後但並非最不重要的,前往 AWS 控制台,確保你的安全群組已打開 443 端口,開放 HTTPS 連接。
完成!導航至HTTPS版本的你的網域,驗證它是否正常工作。如果您遇到像502 Bad Gateway這種錯誤,確保你的Node.js應用程式正確運行。我使用PM2來保持它運行。讓我們使網路更安全!🙂